
NovaStar TU40 Pro: Specifications, Setup & LED Display Guide
The NovaStar TU40 Pro combines media playback, video processing and LED sending functions in one controller. It is worth considering when a meeting room, showroom or standalone display needs both scheduled content and live presentations. Selecting it successfully requires more than checking the headline pixel count: the display topology, source format, receiving cards and daily operating workflow must fit together.
This guide explains NovaStar TU40 Pro specifications, connection choices and commissioning checks for buyers, integrators and operators. It separates documented capabilities from practical planning advice, so you can prepare a realistic system brief instead of relying on a general promise of “4K” or “8K” performance.
Quick answer: the TU40 Pro supports up to 13 million pixels with scaling, but NovaStar distinguishes this from an 8.8-million-pixel limit for pixel-to-pixel display. It has 20 Gigabit LED outputs and an Android-based playback platform. Confirm the actual signal path before ordering a controller for a particular wall.
1. NovaStar TU40 Pro Hardware Specifications and System Performance
01. TU40 Pro Hardware Overview
Start a NovaStar TU40 Pro assessment with the native resolution of your LED wall. Record cabinet counts, pixels per cabinet and cable routing. Physical dimensions alone cannot determine the controller requirement: two walls of the same size can have very different pixel loads because their pixel pitches differ.
| Parameter | Documented specification | Planning implication |
|---|---|---|
| System | Android 13; ARM A73/A53 processor, 2.2 GHz | Test required apps on the installed firmware. |
| Memory | 8 GB RAM; 128 GB internal storage | Reserve room for media, updates and logs. |
| Scaled display load | Up to 13 million pixels | Separate this from native pixel-to-pixel operation. |
| Pixel-to-pixel load | Up to 8.8 million pixels | Check when exact source-to-wall mapping matters. |
| Scaling dimensions | Width 64–16,384; height 64–8,192 pixels | Maximum width and height are separate limits; total load still applies. |
| Power | 100–240 V AC, 50/60 Hz; rated consumption 53.9 W | This is controller consumption, not LED-wall consumption. |
| Environment | −20°C to +50°C; 5–85% RH, non-condensing; IP20 | Provide ventilation and protection from water. |
| Enclosure | 445 × 383 × 49.9 mm; net weight 4.54 kg | Allow installation clearance and service access. |
These hardware values are documented in NovaStar specifications V1.1.2; the scaling distinction is also stated in V1.2.1. Ask your supplier to confirm the applicable firmware and current product documentation.
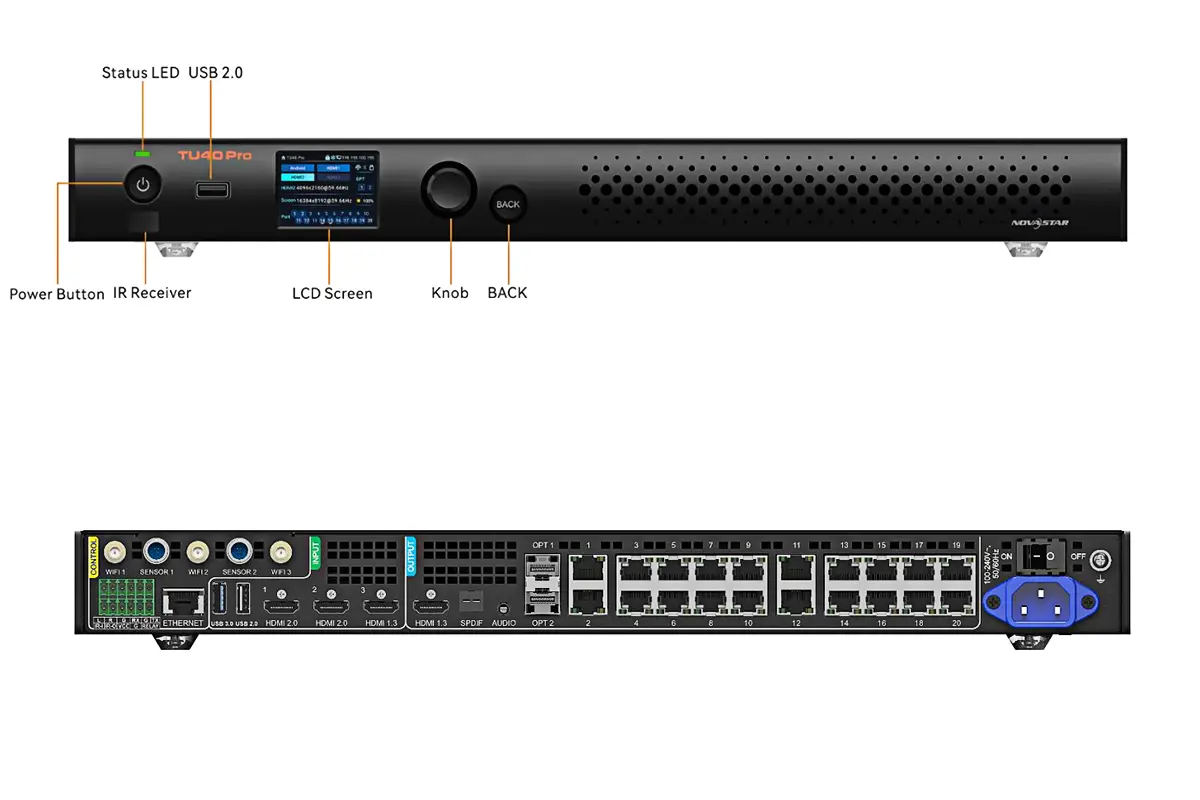
02. System Performance and Advanced Playback Control
For the NovaStar TU40 Pro, source resolution, decoding capacity and LED output load describe different stages of the system. A video file being playable does not mean its pixels can all be displayed natively, and a large output canvas does not imply unlimited simultaneous video windows.
A practical sizing example is a wall measuring 3,840 × 2,160 pixels: its total is 8,294,400 pixels. That is below the published pixel-to-pixel ceiling, but it still needs a suitable per-port distribution and compatible receiving cards. A 4,096 × 2,304 wall totals 9,437,184 pixels; the total falls below the scaled ceiling but exceeds the stated pixel-to-pixel ceiling. Neither calculation alone approves the design.
Prepare a port map rather than dividing the total by twenty and assuming every cable is equivalent. One long cabinet chain can become the limiting path while other outputs remain lightly loaded. Ask the integrator to verify each path at the intended frame rate and bit depth, then preserve the approved map with the project records.
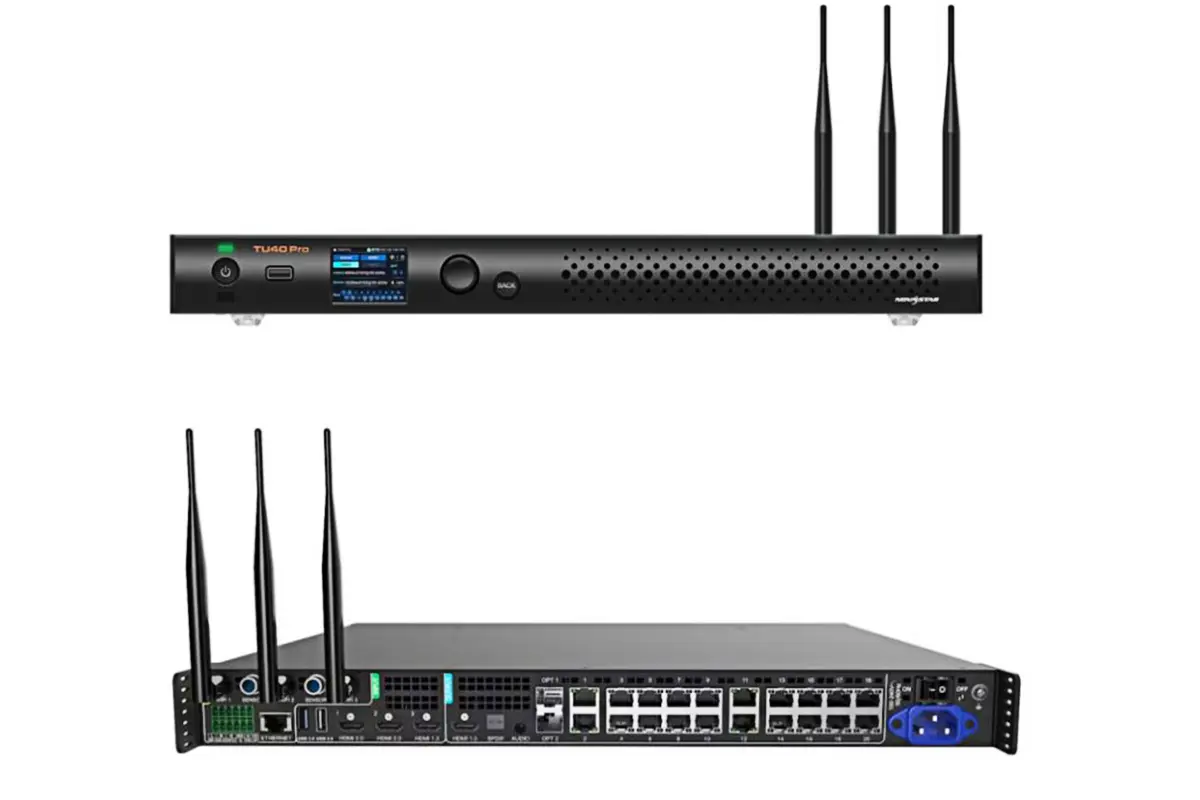
03. TU40 Pro Resources Download
Use documents explicitly labeled TU40 Pro. TU4K Pro, TU40 Pro and MX40 Pro are different model names; a similar-looking download title is not sufficient identification. Keep a copy of the document used for acceptance testing alongside the installed firmware version.
- NovaStar TU40 Pro specifications V1.2.1
- NovaStar TU40 Pro specifications V1.2.4
- NovaStar TU40 Pro user manual V1.2.2
2. Key Features of NovaStar TU40 Pro Playback Control Processor
01. Smart Playback Management
The strongest reason to choose a NovaStar TU40 Pro is an operating workflow that combines local content with visitor presentations. Define what should happen before a meeting, during a source change and after the room is vacated. A written sequence helps the installer configure a predictable system and gives operators something concrete to test.
For a showroom, prepare approved product loops with consistent aspect ratios and a designated owner for updates. For a conference room, agree on the default source, audio route and recovery procedure. When an external presenter disconnects, staff should know how to return to the approved local program without searching through unrelated applications.
02. Smart Image Optimization
The TU40 Pro offers Standard, Meeting, Vivid and Skin display modes. Evaluate them using the content people actually view: fine spreadsheet text, faces, logos and dark video scenes. A brighter or more saturated picture is not automatically a more accurate one.
NovaStar limits AI enhancement to the internal Android source and HDMI 1 during single-window video playback. Peak-brightness functionality also depends on specified receiving cards, including A8s Pro or A10s Pro. Treat these as conditional features, not promises that every existing LED wall will gain the same processing benefits.
During commissioning, compare enhancement on and off with identical source material. Check whether small text, skin tones or gradients change undesirably. Save the chosen settings and note which source was tested, so later operators can distinguish a display fault from a deliberately selected picture mode.
03. Easy Screen Sharing
NovaStar TU40 Pro wireless mirroring supports several device platforms, but the connection procedure differs by operating system and software version. Give visitors a short instruction card with the room’s device name and the approved connection method. Test both a managed company laptop and an ordinary guest device before accepting the installation.
Four-way mirroring is included in the documented package; nine-way mirroring and whiteboard functionality require separate activation. Do not budget those options as standard equipment. The newer V1.2.4 specification also identifies the optional PTB1307 dongle.
A split layout reduces the space available to each presenter. Demonstrate the intended number of windows at the back of the room, checking text size and contrast. Keep a wired presentation route available when a guest network or radio environment makes mirroring unreliable.
04. Simple System Management
Make the NovaStar TU40 Pro easy to support by naming it clearly and recording its network location, firmware version and screen configuration. Keep administrator credentials with the responsible team rather than leaving them in a public instruction sheet. Label the network-control connection separately from LED data outputs.
Save a configuration backup after acceptance and whenever the cabinet layout changes. A short change log should identify the person, date and reason for each adjustment. This is more useful for fault isolation than a collection of screenshots with no explanation of which settings were active.
3. TU40 Pro Playback Control Processor Input and Output Connectivity Options
Plan NovaStar TU40 Pro connectivity around complete signal paths. For each use case, identify the source, connector, output destination and control method. Ports with a similar shape can serve different purposes, especially the network-control connection and numbered LED outputs.
| Connection | Quantity or function | Typical use and check |
|---|---|---|
| HDMI 2.0 inputs | 2; documented up to 4,096 × 2,160 at 60 Hz | Laptop or external player; validate timing and color format. |
| HDMI 1.3 input | 1 | Additional source; verify its separate timing limits. |
| USB | 2 USB 2.0 and 1 USB 3.0 | Local media or peripherals; test actual files and devices. |
| LED Ethernet outputs | 20 Gigabit ports | Receiving-card chains; document cable order and load. |
| Optical outputs | 2 × 10G | Fiber conversion; confirm modules and converters separately. |
| HDMI monitoring output | 1 HDMI 1.3 | Service monitor; not a replacement for LED data outputs. |
| Audio | SPDIF, 3.5 mm, HDMI ARC, Phoenix | Match the sound-system input and select the intended route. |
| Control interfaces | Network, wireless and expansion connections | Room control, apps or sensors; confirm accessory compatibility. |
Connector details vary across documentation revisions. The V1.2.4 specification uses ARC terminology, correcting earlier eARC wording. Confirm the physical unit and firmware before promising a particular audio integration.
01. Inputs and Source Compatibility
For NovaStar TU40 Pro HDMI connections, a reliable commissioning sequence begins with a common supported progressive timing. Confirm a stable image, then test the target format. Include the exact cable, adapter and source computer intended for daily use; a successful bench test with another laptop does not prove the complete installed path.
Document whether a presentation is mirrored or extended. Extended desktops can accidentally put the slide show on a different output, which looks like a controller issue even when the processor is working. Test transitions, embedded video and audio together before handover.
02. Outputs, Fiber and Audio Routing
NovaStar TU40 Pro optical outputs should be designed with compatible conversion equipment and an explicit cable map. NovaStar describes the optical outputs as primary outputs, with OPT 1 carrying ports 1–10 and OPT 2 carrying ports 11–20; they are not Ethernet loop-backup ports.
Commission audio as a separate path. Confirm the selected source contains audio, the controller volume is appropriate and the downstream sound system is listening to the connected input. Label the final route so an operator can recover after someone changes a source or amplifier setting.
03. Control and Expansion Interfaces
Ask the integrator to define which NovaStar TU40 Pro controls ordinary users may change. Brightness and source selection may be everyday tasks; receiving-card parameters and topology are usually commissioning settings. A clear division reduces accidental misconfiguration during a presentation.
When selecting an LED display system, request a complete compatibility review covering cabinets, receiving cards, controller and installation accessories. A controller model name alone does not establish that an existing screen supports every advanced function.
4. NovaStar TU40 Pro Advanced Playback and Control Functions
01. Local Playback and Content Preparation
Prepare a small acceptance playlist for the NovaStar TU40 Pro before producing the full content library. Include a still image, a representative promotional video, a long-duration clip and any content containing sound. Record the export settings that succeed, including codec, resolution, frame rate and bitrate.
The manufacturer’s V1.2.4 playback summary lists two 4K streams rather than four. Its 8K playback note is codec-specific and does not mean arbitrary resolutions between 4K and 8K are supported. Consult the decoding tables and playback notes together. An MP4 extension by itself is insufficient evidence of compatibility.
Design content for the wall’s aspect ratio. Letterboxing, stretched images and clipped logos often originate in the media export rather than the LED processor. Place important text and branding within a reviewed safe area and inspect the result at normal viewing distance.
02. Presentation Quality and Practical Evaluation
Evaluate the NovaStar TU40 Pro with a repeatable test sequence. Start with fine text, then gradients, fast motion, faces and branded colors. Compare live HDMI and local playback separately because they use different paths. Record the chosen output settings before changing picture controls.
Check responsiveness with the actual application, especially for interactive meetings or live camera use. Do not assume that support for a high-resolution input guarantees a particular end-to-end latency. The source, adapters, processing, receiving cards and display behavior all contribute to the observed result.
For a practical explanation of black levels and image evaluation, see HonghaiLED’s display contrast ratio guide. Use a viewing test rather than exaggerated contrast settings to decide whether important details remain visible.
03. Operations, Recovery and Handover
A NovaStar TU40 Pro installation should have a simple recovery path: return to a known source, load approved content and restore documented settings. Rehearse that path with the staff who will actually operate the room. A technically capable system can still be difficult to use if handover consists only of a product manual.
For unattended displays, test restart behavior and scheduled operation with the installed firmware. Check the device clock and time zone, then observe what happens after a controlled power cycle. Preserve the approved configuration before enabling automated operating sequences.
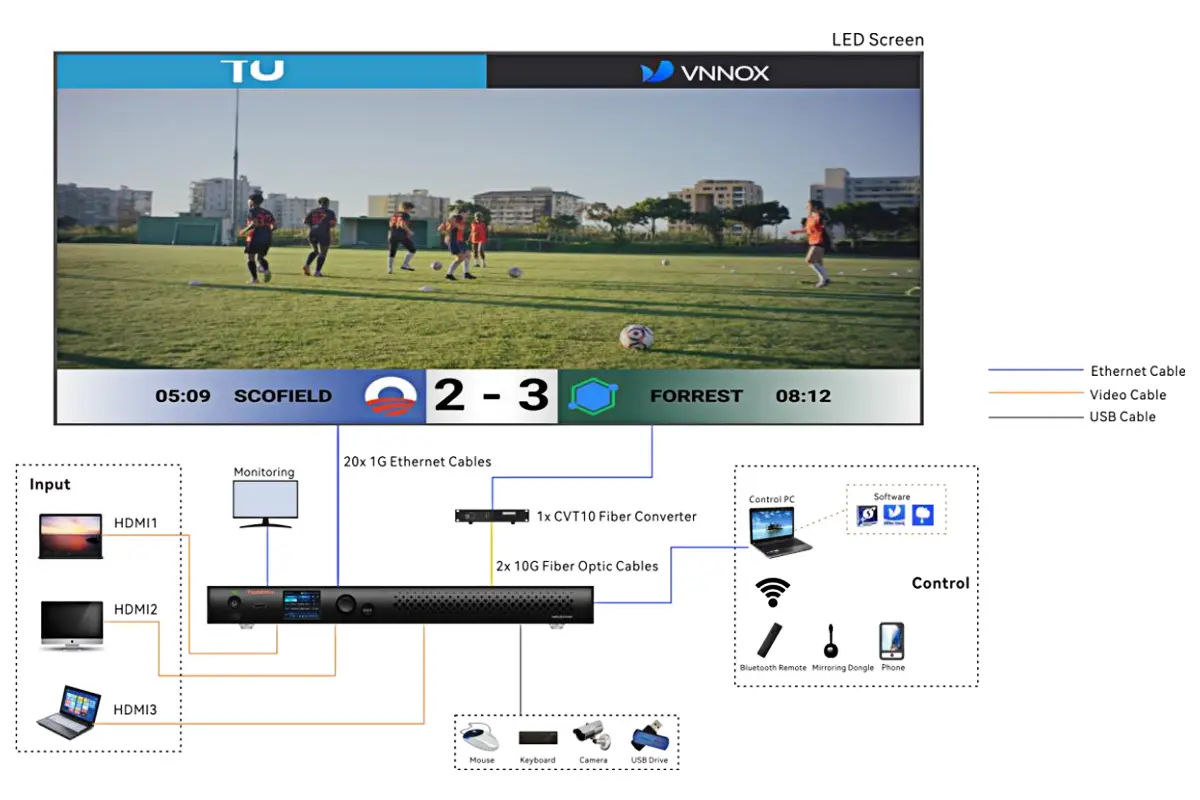
5. TU40 Pro Playback Control Processor Setup and Operation Guide
01. Hardware Installation and Connection
Install the NovaStar TU40 Pro where staff can access connectors and service controls. Provide airflow and strain relief, and avoid trapping the unit behind an inaccessible cabinet. Its IP20 enclosure needs protection even when the LED screen itself is installed outdoors.
Connect LED data cables according to the approved map, not whichever ports are easiest to reach. Label both cable ends with port and chain identifiers. Keep the control-network cable visually distinct, then connect the agreed source and audio paths before beginning configuration.
02. Initial System Setup
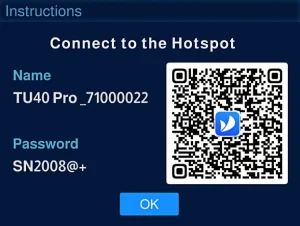
The NovaStar TU40 Pro user manual describes initialization, remote pairing and screen configuration. Choose the language and time zone, identify the device clearly and establish the approved network connection. Pair the remote by pointing it at the receiver and holding Home and Menu until the pairing prompt appears.
Use VNNOX Care’s local configuration workflow for the screen and follow the relevant receiving-card instructions. Verify cabinet order with mapping and test patterns before displaying finished media. Preserve a known-good backup, and confirm that the configuration survives the approved restart procedure. See the TU40 Pro user manual.
03. Essential Daily Operations
Provide a one-page operator guide for the NovaStar TU40 Pro with the default source, volume setting, brightness range and recovery steps. Include instructions for ending a meeting and returning to local content. Test the guide with someone who did not commission the system.
Before a scheduled event, verify the source image, sound and remote operation. If a visitor uses wireless mirroring, connect early enough to resolve permissions or network issues. Keep the approved wired source ready so the meeting does not depend on troubleshooting a guest device.
04. Recommended Control Apps
ViPlex Handy is used for content editing, program transfer and screen control; VNNOX Care addresses screen configuration and topology. Keep these roles clear in the NovaStar TU40 Pro handover. Installing both apps does not replace having the correct screen settings and access information.
Wireless mirroring instructions change with software revisions. Use the download method shown by the device or current manual rather than an old third-party link. The V1.2.2 manual updates the desktop mirroring download guidance and discusses interference and 5 GHz use. Test reception in the finished room, including its walls and normal network traffic.
05. TU40 Pro Troubleshooting Checklist
When diagnosing a NovaStar TU40 Pro problem, change one variable at a time and preserve the working configuration. The following table is an isolation workflow, not a claim that one adjustment will fix every installation.
| Symptom | First checks | Next step |
|---|---|---|
| No picture | Power, selected source, source output, blank/freeze state | Try a known-good source and cable; compare with a test pattern. |
| One cabinet chain missing | Port label, connectors, chain power and mapping | Isolate the affected chain; preserve the approved configuration. |
| Wrong cabinet order | Actual cable order versus saved topology | Use mapping patterns and correct the documented mismatch. |
| Wireless stutter | Distance, obstructions, interference and network path | Compare with wired HDMI; investigate radio conditions separately. |
| Media file fails | Codec, frame rate, resolution, bitrate and storage | Test a short known-good export and consult the decoding table. |
| No sound | Source audio, volume, cable and amplifier input | Test the agreed audio route independently. |
| Flicker or unstable image | Input timing, cables and whether test patterns are stable | Record affected sources and cabinets; export diagnostics for support. |
For persistent faults, provide support with the firmware version, cabinet map, source format, affected ports and diagnostic results. Avoid a factory reset until the required backups are available. A precise symptom record helps distinguish source issues from configuration, cabling or LED hardware faults.
6. NovaStar TU40 Pro FAQs
01. What is the maximum resolution supported by the TU40 Pro?
The NovaStar TU40 Pro has separate source-timing, scaling-dimension and total-load limits. Its headline capacity is 13 million pixels with scaling, versus 8.8 million for pixel-to-pixel display. Verify the chosen HDMI timing and per-port plan; maximum width and height cannot simply be multiplied into a supported wall size.
02. Can I use the TU40 Pro for outdoor LED displays?
Yes, the controller can form part of an outdoor display system, but the NovaStar TU40 Pro itself is IP20. Install it in a protected, appropriately ventilated location. Outdoor suitability also depends on the LED cabinets, installation environment and complete system design.
03. How do I enable split-screen functionality?
Check the mirroring layout options on the installed system. Four-way mirroring is included in the documented TU40 Pro package; nine-way mirroring requires a separately purchased activation. Confirm any whiteboard license and optional dongle before ordering additional presentation features.
04. Does the TU40 Pro support HDR content?
Do not assume full HDR compatibility from a 4K label or AI enhancement feature. Confirm the exact HDR format, source timing, firmware, receiving cards and display calibration with the supplier, then test representative content. This guide does not claim universal end-to-end HDR support for the NovaStar TU40 Pro.
05. What should I do if my screen flickers during operation?
Compare a known-good source and cable with an internal test pattern. Note whether the whole wall or one chain is affected. Record input timing and firmware, preserve the configuration and export available diagnostics. Avoid changing several NovaStar TU40 Pro settings at once because that obscures the cause.
7. Conclusion: Choosing and Commissioning the NovaStar TU40 Pro
The NovaStar TU40 Pro is most useful when local playback, live sources and everyday LED control fit an agreed operating workflow. Successful selection depends on native wall resolution, scaling requirements, port distribution, receiving-card compatibility and the content people will actually show.
Before ordering, request a documented system proposal covering the cabinet map, source formats, audio route, optional licenses and installation conditions. Before handover, verify that plan with representative media and ordinary operators. Those checks turn the TU40 Pro’s capabilities into a maintainable display system rather than an unsupported list of features.
Related Posts
NovaStar MX6000 Pro Video Wall Controller: Specs, Price & Manual
NovaStar MX6000 Pro in one paragraph: the NovaStar MX6000 Pro…
NovaStar H5 Video Wall Splicer: Specs, Setup & Manual
The NovaStar H5 video wall splicer is a 5U, modular…
NovaStar TB10 Plus: Specifications, Setup and TB20 Plus Comparison
The NovaStar TB10 Plus is an Android 10 multimedia player…

No Comments