
NovaStar H5 Video Wall Splicer: Specs, Setup & Manual
The NovaStar H5 video wall splicer is a 5U, modular all-in-one splicing processor and controller for fine-pitch LED video walls. It accepts up to 10 input cards (40 input channels) and 3 output cards (12 output channels), drives up to 48 layers, and loads up to 78 million pixels with the enhanced H_4xfiber sending card. Input cards support HDMI 2.1 up to 8192×4320@30Hz, HDMI 2.0 and 12G-SDI up to 4096×2160@60Hz, and DP 1.4 up to 7680×4320@30Hz. It is controlled from a web browser, NovaLCT or the 7-inch front touchscreen, with preset switching under 60 ms and end-to-end latency as low as one frame.
catalogue
1. What Is the NovaStar H5 Video Wall Splicer?
2. NovaStar H5 Specifications
3. NovaStar H5 Datasheet, Manual & Firmware
4. How to Install the NovaStar H5 Hardware
5. Connecting Input Sources to the H5
6. Configuring LED Wall Outputs with RJ45 or Fiber
7. Web Control and NovaLCT Setup
8. NovaStar H5 vs H2, H9, H15 and VX Series: How to Choose
9. What Drives the NovaStar H5 Price
10. Troubleshooting Common H5 Problems
11. FAQs
12. Conclusion
1. What Is the NovaStar H5 Video Wall Splicer?
The NovaStar H5 is the mid-size model in the H Series of video wall splicing processors. It combines video processing and video control in one 5U chassis, or works as a pure splicing processor. Its modular, plug-in design lets you mix and hot-swap input and output cards — HDMI, DisplayPort, DVI, VGA, CVBS, SDI, IP, ST 2110, NDI and HDBaseT — in the same unit, so one processor can run a control room wall, an exhibition wall or a rental LED video wall without extra switchers.
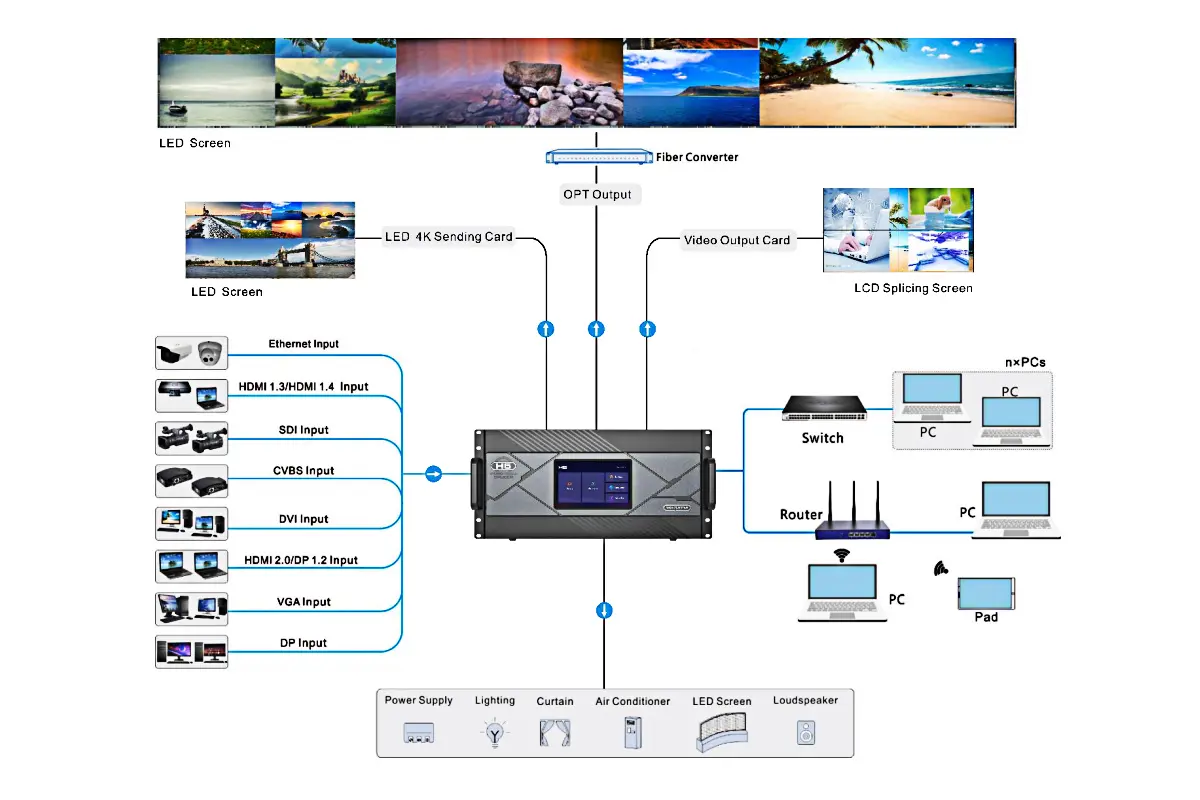
What that means for your project
- One chassis for a mixed signal wall. Ten input card slots and three output card slots mean HDMI, SDI, IP cameras and legacy sources can share one processor, so external switchers can leave the rack.
- Headroom for a growing wall. Loading capacity runs from 31.2 to 78 million pixels depending on the sending card, and cards are hot-swappable, so the processor can be expanded without a redesign.
- Hardware timing, not software timing. Latency as low as one frame and preset switching under 60 ms keep live camera feeds, tickers and PIP layouts in sync.
- Control that fits the site. Browser control needs no dedicated PC, NovaLCT handles deep configuration, and the 7-inch front touchscreen covers operation during events.
- Redundancy where it counts. Backup is available between devices, between input sources and between LED sending cards, with an optional redundant power supply.
Typical H5 projects are control rooms, command centres, exhibition and presentation walls, corporate lobbies and stage rental. NovaStar’s own documentation lists energy and power, water conservancy, meteorology, public security and traffic management, banking and finance, broadcasting, education and rental among the target applications. Buyers are usually system integrators, control-room contractors and rental companies that need one processor to handle mixed sources on a single wall.
2. NovaStar H5 Specifications
These are the H5 specifications published by NovaStar (H5 Video Wall Splicer Specifications V1.17.0). Where a figure changes with the card option, the card is named:
| Feature | H5 specification |
| Model | H5 (NovaStar H Series video wall splicer) |
| Rack unit | 5U — 482.6 × 532.8 × 228.2 mm, 17 kg (chassis), 21.3 kg gross |
| Max input cards | 10 (max 40 input channels) |
| Max output cards | 3 (max 12 output channels) |
| Max layers | 48 |
| Max loading capacity | 31.2 MP (H_16xRJ45+2xfiber) · 39 MP (H_20xRJ45) · 62.4 MP (H_4xfiber) · 78 MP (H_4xfiber enhanced) |
| Input connectors | HDMI 2.1, HDMI 2.0, HDMI 1.4/1.3, DP 1.4/1.2/1.1, SL/DL-DVI, VGA, CVBS, 3G-SDI, 12G-SDI, ST 2110, NDI, IP, HDBaseT, audio |
| Max input resolution | 8192×4320@30Hz (HDMI 2.1) · 4096×2160@60Hz (HDMI 2.0, DP 1.2, 12G-SDI) · 7680×4320@30Hz (DP 1.4) · 4096×2160@60Hz (ST 2110) |
| Output connectors | RJ45 (Ethernet), OPT fiber, HDMI 2.0, HDMI 1.4, DVI, 3G-SDI, 12G-SDI, HDBaseT |
| LED sending cards | H_16xRJ45+2xfiber, H_20xRJ45, H_4xfiber, H_4xfiber (enhanced) |
| HDR and color | HDR10 and HLG processing, 10-bit video source input and processing |
| Latency and presets | Latency as low as 1 frame; up to 2,000 presets with fade effect and seamless switching under 60 ms |
| Control | Web control (B/S architecture, cross-platform), NovaLCT, 7-inch LCD touchscreen, VICP tablet app, OpenAPI, SNMP, Stream Deck, TCP/IP and RS232 |
| Backup design | Backup between devices, input sources and LED sending cards; optional redundant power supply |
| Power | 100–240 V~, 50/60 Hz, 10 A to 5 A; 400 W power consumption; single power supply as standard |
| Environment | Operating 0°C to 45°C, 0% to 80% RH non-condensing; storage –10°C to +60°C, 0% to 95% RH |
| Noise level | Below 45 dB(A) typical at 25°C |
| Certifications | CCC, CE, FCC, IC, KC, RCM, UKCA, UL, CB, CMIM, PSE |
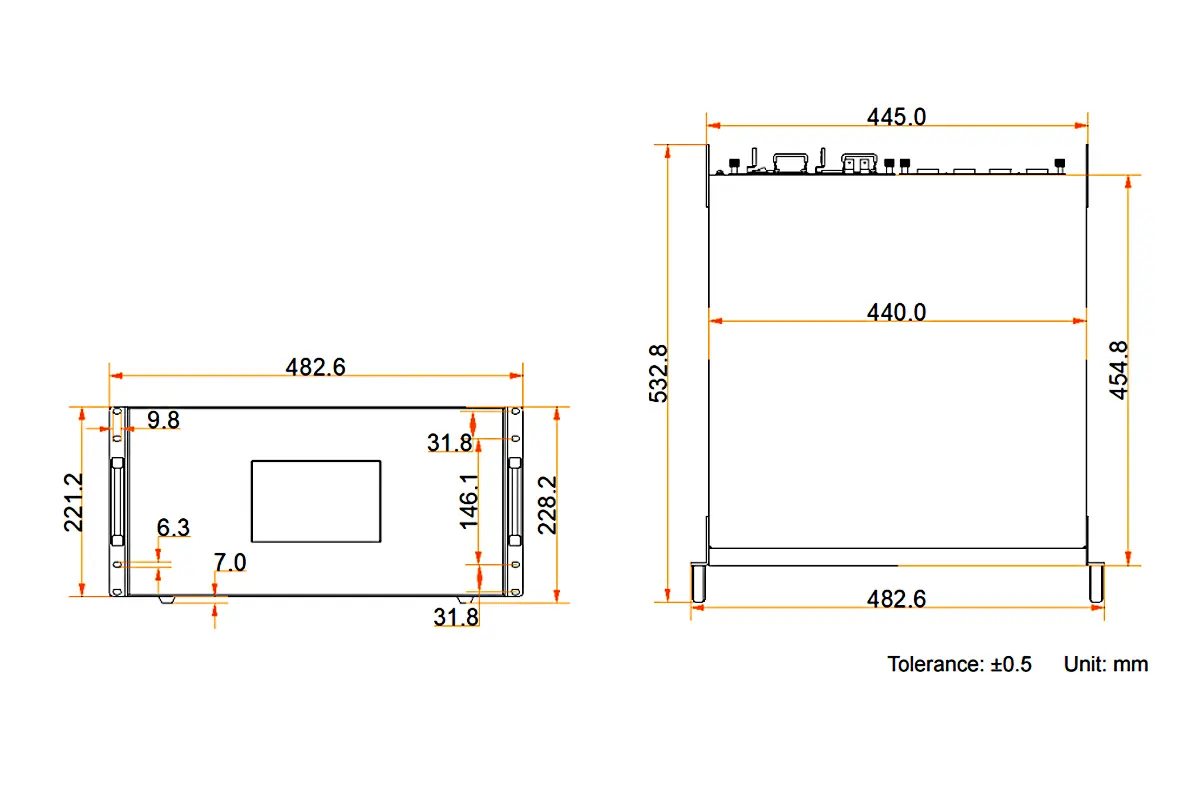
One limitation is worth planning for: if a preset holds more than 16× SL layers, 8× DL layers, 4× 4K layers or 2× 8K layers, the fade transition is not supported and the processor switches with a cut instead. Layer capacity also follows the connected input connector, so if you feed a 1080p source into an HDMI 2.0 connector, that layer is billed as a 4K layer. Plan layer counts against the connector capacity you actually use.
3. NovaStar H5 Datasheet, Manual & Firmware
If you need the NovaStar H5 datasheet, manual or firmware, these are the current official documents and packages, listed by their exact names so you can identify the right revision:
- H5 Video Wall Splicer Specifications V1.17.0 (released 2026-05-30) — the H5 datasheet: connectors, card options, loading capacity, power, dimensions and environment data.
- H Series Video Wall Splicers User Manual V1.15.0 — installation, web control, screen configuration and operation for H2, H5, H9, H15 and H20.
- H Series Quick Start Guide — the short install-and-first-boot sheet shipped with the chassis.
- H series firmware package (DATA_H) — the firmware used for online updates on the H5 web page.
- H_control card — the control card that provides the web interface and NovaLCT connectivity.
Always match the document revision to your hardware. NovaStar updates the H5 datasheet often — V1.17.0 added the matrix mode and the network security configuration, V1.16.0 added the H_2xDP1.2 input card and the H_4xfiber sending card (enhanced), and V1.15.0 added the H_4xfiber input card and the H_1xHDMI2.1+1xDP1.4 input card. A card that does not appear in an older PDF may still be supported by your unit.
Watch the H5 in operation
Two videos are useful before your first deployment — an overview of the H Series hardware, and a walkthrough of screen configuration on the processor:
- NovaStar H Series Introduction (official NovaStar video)
- NovaStar H Series Video Wall Splicers Operation Video – Screen Configuration
If you would rather not hunt through vendor download pages, ask our team for the current H5 datasheet, manual and firmware together with your configuration quote, and we will send the matching revisions for your unit. Software for NovaStar controllers is also listed on our NovaLCT software download list and on the NovaStar LED control software download page.
4. How to Install the NovaStar H5 Hardware
Follow these steps to install the H5 video wall splicer correctly in a standard 19-inch rack:
Step 1: Prepare the rack
- Reserve 5U of rack height and allow enough depth — the chassis is 532.8 mm deep plus cable clearance.
- The rack must withstand at least 4× the total weight of the mounted equipment.
- Fix the unit with eight M5×8 screws. Mount it horizontally: do not mount the H5 vertically or upside-down.
- Leave clearance at the front and rear for airflow. The H5 draws 400 W and its fan speed and module temperature are monitored from the web interface.
- Prefer a rack with room for a spare power module if the project needs redundant power.
Step 2: Insert input and output cards
- The rear panel silkscreen tells you which card goes where: “I-x” slots take input cards only, “O-x” slots take output cards only, and the “MVR” slot takes the preview card.
- Insert each card into the slot type it is designed for — for example an H_2xHDMI2.0 input card into an I slot, or an H_16xRJ45+2xfiber sending card into an O slot.
- Input and output cards are hot-swappable, but power down the unit for the first build so you can verify seating.
- Wear an anti-static wrist strap whenever you handle cards.
Step 3: Connect power
- The H5 uses a universal 100–240 V~, 50/60 Hz input (10 A to 5 A), so the same chassis works on 110 V and 220 V supplies. Power consumption is 400 W.
- Use the supplied power cord, connect it to a grounded outlet, and add surge protection on site.
- A single power supply is standard; a redundant power module is optional for mission-critical walls.
- Avoid sharing the circuit with heavy loads such as air conditioning or hoists.
Step 4: Connect the control network
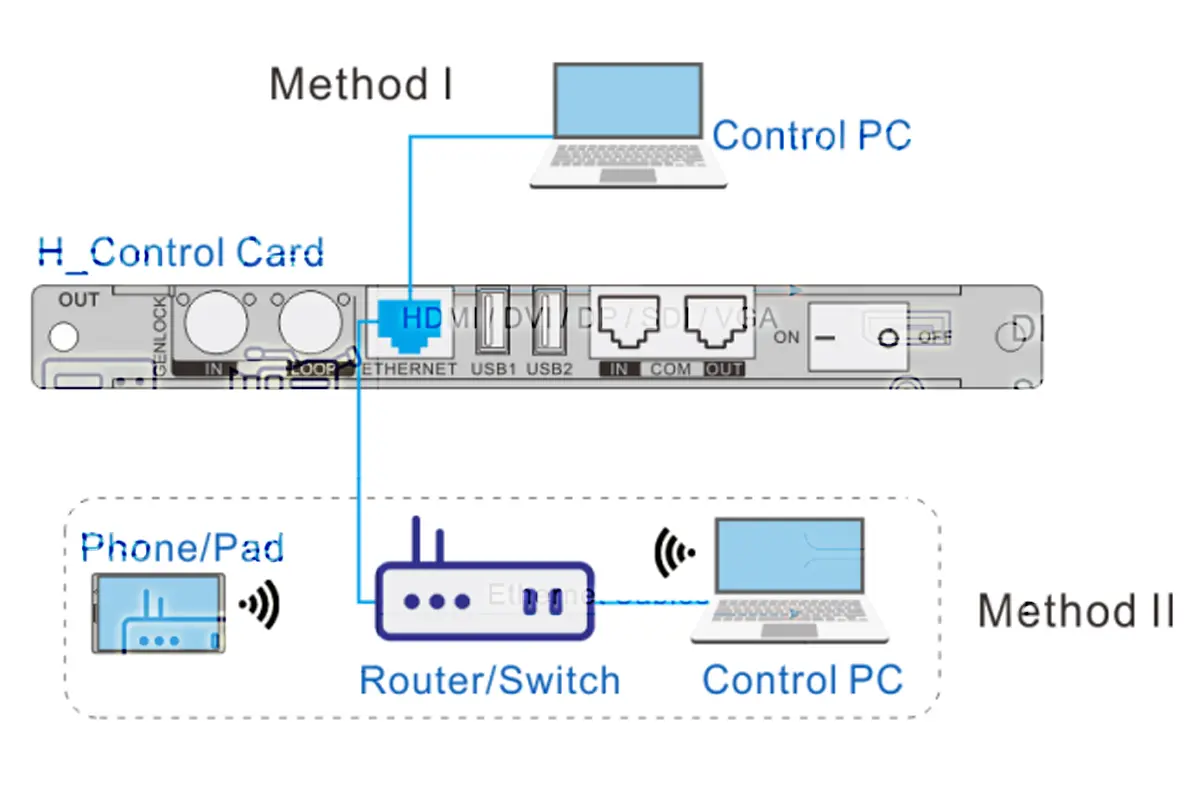
- Connect a control PC or a network switch to the H_control card Ethernet port. The port is 10/100 Mbps self-adaptive with a default IP address of 192.168.0.10.
- On larger projects, connect the H5 and your control devices to the same switch so several operators can reach the web interface.
- Keep the H5 and the control PC on the same network segment (for example 192.168.0.x) for the first setup.
- Because control runs over the network, review the H5 network security settings — application security modes, password and login rules, failure validation, firewall blacklist for IP ranges and MAC addresses, Ping blocking, and the HTTPS, SSH, NTP and device-discovery services you actually need.
Step 5: Power on and read the front panel
- Switch on the power module and wait for the device to boot.
- Use the 7-inch LCD touchscreen on the front panel for first checks: it shows connector connection status in colour, live fan, voltage and temperature data, and the screen monitoring image, and it lets you run basic operations without a PC.
- Confirm the control IP address on the touchscreen or in the web interface before you open NovaLCT.
- If you are commissioning an indoor LED display, do the receiving-card and cabinet mapping before you tune brightness and colour.
5. Connecting Input Sources to the H5
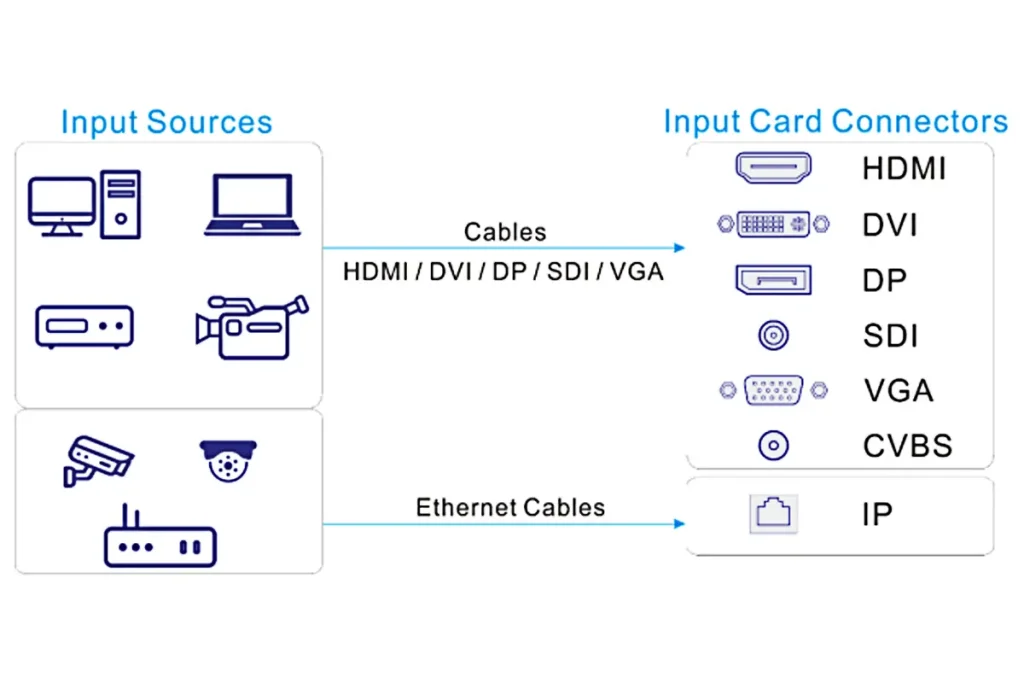
The H5 accepts the industry-standard connectors — HDMI, DVI, DP, VGA, CVBS, SDI, IP, NDI, ST 2110 and HDBaseT. Because capacity follows the card, check which input card you are patching into before you set source resolution.
Identify your input card type
Check the silkscreen on the rear panel and the card label:
- H_1xHDMI2.1+1xDP1.4 — HDMI up to 8192×4320@30Hz and DP 1.4 up to 7680×4320@30Hz at 8-bit.
- H_2xHDMI2.0, H_2xHDMI2.0+2xDP1.2, H_1xHDMI2.0+1xDP1.2 — up to 4096×2160@60Hz (8-bit) or 4096×2160@30Hz (10-bit).
- H_1x12G SDI — up to 4096×2160@60Hz, supporting ST-2082-1 (12G), ST-2081-1 (6G), ST-424 (3G) and ST-292 (HD).
- H_4x3G SDI — up to 1920×1080@60Hz.
- H_2xRJ45 IP — up to 512 IP camera inputs, with input mosaic.
- H_1xNDI, H_1xST2110, H_4xHDBaseT, H_4xVGA, H_2xCVBS+2xVGA, H_2xAudio input+2xAudio output and H_4xHDMI (2× HDMI 1.3 + 2× HDMI 1.4) cover legacy and audio sources.
Match resolution, refresh rate and colour depth
- Set the source to a resolution the card supports. 4K@60Hz is available on HDMI 2.0 and 12G-SDI cards at 8-bit; at 10-bit those connectors accept 4096×2160@30Hz.
- Decimal frame rates are supported, which matters when you patch 23.98, 29.97 or 59.94 Hz broadcast sources.
- Keep HDCP-encrypted sources in mind: the H5 decrypts HDCP sources automatically, but a protected source that is re-split to several sinks can still be refused by the source device.
- If an image flickers or drops, lower the colour depth or disable HDR on the source rather than changing the processor first.
Use the right cables
- HDMI / DVI: shielded cables, kept short. For long runs use an active optical HDMI cable or an extender rather than a passive cable.
- SDI: 75-ohm BNC coax (RG6 or better). Keep 3G-SDI runs within copper limits and move to 12G-capable coax for 4K links.
- IP / NDI / HDBaseT: Cat6 or better into a network switch — not into the control PC port.
- Fiber: duplex LC fiber for OPT links; fibre is immune to EMI, which is why it is used in stadiums, factories and outdoor installations.
Verify signal detection
- Open the H5 web interface or NovaLCT and check the input status: a green indicator means the signal is locked, red or grey means no signal.
- If a source shows no signal, check the cable, then the source output setting, then the card type — in that order.
- Use the input monitoring and self-test functions to confirm the connector is receiving before you troubleshoot the screen.
Set EDID manually if needed
- If a source refuses to output, open EDID management and either clone EDID from a working display or force a standard preset such as 1920×1080@60Hz.
- Input and output EDID management is supported on the H5, so you can also present a fixed EDID to the source.
- Rename and crop input sources after mapping — this keeps the layer list readable on walls with a dozen sources.
6. Configuring LED Wall Outputs with RJ45 or Fiber
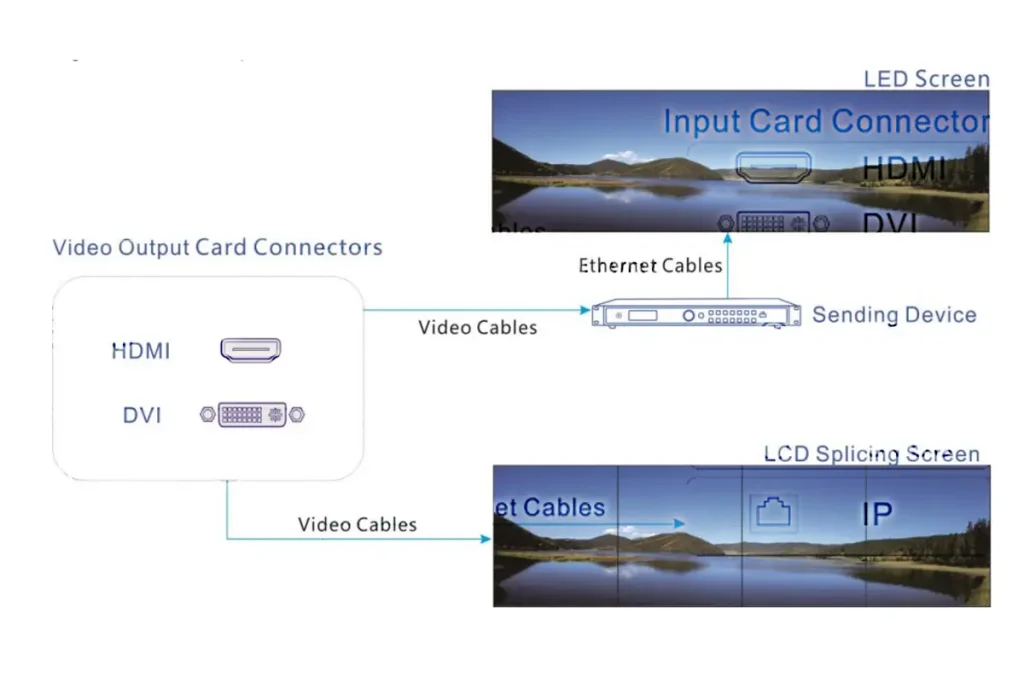
The H5 drives LED displays through output cards — RJ45 Ethernet ports for normal distances and OPT fiber ports for long runs. Choose the sending card first, because it sets how many pixels the H5 can load.
Select the correct sending card
- H_16xRJ45+2xfiber — 16× RJ45 ports plus 2× OPT ports that copy the output of RJ45 ports 1–8 and 9–16. Loads up to 31.2 million pixels.
- H_20xRJ45 — 20× RJ45 ports, highest copper port density. Loads up to 39 million pixels.
- H_4xfiber — 4× OPT ports with independent, copy and backup working modes. Loads up to 62.4 million pixels.
- H_4xfiber (enhanced) — 8× 10G OPT ports with copy and backup modes. Loads up to 78 million pixels, the highest capacity available on the H5.
The fiber sending cards and the H_20xRJ45 sending card cannot be used together to load the same screen, so decide the transmission method per screen before you order cards.
Connect via RJ45
- Run Cat6 or better cable from each RJ45 port to the receiving cards — for example MCTRL600 — or to the controller’s receiving chain.
- Map port numbers to the physical screen layout (Port 1 = top-left cabinet) and label the cables; troubleshooting a 20-port wall without labels wastes hours.
- Each port drives one receiver chain independently — do not daisy-chain ports together.
- Every H5 sending card can run the same screen, which makes it easy to add ports without replacing the card.
Connect via fiber (OPT)
- Use the OPT ports when the run exceeds practical copper distance or crosses an electrically noisy environment.
- Each OPT port carries TX and RX, so pay attention to the status colour: grey usually means a transmission or receiving-end problem, green means the link is healthy.
- For a fibre link you will also need fibre converters or fibre-capable receiving hardware — for example a NovaStar fiber converter at the far end.
Configure the wall in NovaLCT
- Create the screen and associate output ports. Only ports of the same type and capacity can be grouped on one virtual screen.
- Enter the wall’s total resolution — for a 4×1 array of 960×1080 cabinets, for example, 3840×1080.
- Single video connectors and single ports have their own maximum canvas sizes, so an unusually wide or tall wall may need to be split across ports.
- Check that every cabinet lights up uniformly and run the self-test to confirm that the whole wall is in frame and synchronised.
With the correct sending card and port mapping, the H5 delivers pixel-perfect, low-latency video across the wall — whether the receiving hardware is in the same rack or at the far end of a fibre run. If you are also using sending cards for a single-cabinet project, our guide to the TCC160 control card explains the alternative approach.
7. Web Control and NovaLCT Setup
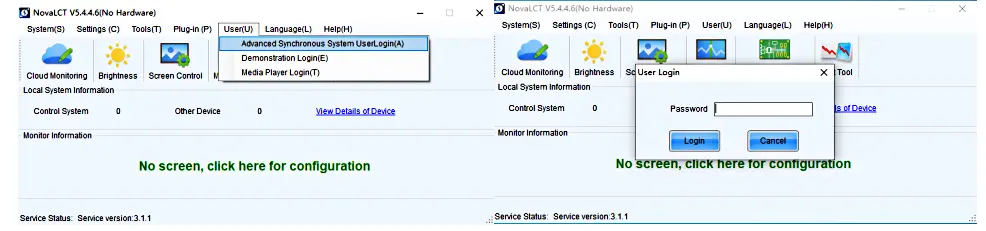
The H5 uses a B/S (browser/server) architecture, so day-to-day control does not need a dedicated PC: any device on the network — Windows, Mac, iOS, Android or Linux — can open the web interface and work with the processor. NovaLCT remains the standard Windows tool for deeper screen configuration.
Start with the web interface
- Put your PC or tablet on the same network segment as the H5 and open the control IP in a browser. The H_control port is 10/100 Mbps self-adaptive with a default address of 192.168.0.10.
- The web pages give you real-time response with 1000M/100M self-adaptive network control and allow several users to collaborate on the same wall.
- From the web interface you can monitor input and output cards, set device properties, manage presets, configure network security and update firmware.
- If you cannot reach the device, work through the network first: same subnet, correct IP, no duplicate addresses, and the relevant system services (HTTP/HTTPS, device discovery) enabled in the security settings.
Use NovaLCT for screen configuration
- Install the current NovaLCT release on a Windows PC and run it as administrator — some drivers need system-level access.
- Click Search Device to find the H5 on the network, then create the screen and associate the output ports.
- Add and position layers, set exact pixel sizes, and enable transparency or borders where you need overlays.
- Save the configuration as a preset: the H5 holds up to 2,000 presets, including preset playlist playback for scheduled switching.
- Close NovaLCT properly when you finish. Force-quitting the application can leave the processor in an unfinished state.
Day-to-day operation without a PC
- Switch presets from the 7-inch front touchscreen, which also reports fan speed, voltage and temperature.
- Use the VICP app on a tablet, or integrate the wall into a wider control system through OpenAPI, SNMP, Stream Deck or a professional control processor.
- Matrix mode makes input-to-output switching straightforward for simple source-change jobs.
- Firmware can be updated from the web page, so you no longer need to take a laptop to site for every revision.
8. NovaStar H5 vs H2, H9, H15 and VX Series: How to Choose
The H5 sits in the middle of the H Series. The differences that matter are rack height, card slots and layer count, not image quality:
| Model | Rack unit | Max input cards | Max output cards | Max layers | Loading (H_20xRJ45 / H_4xfiber enhanced) |
| H2 | 2U | 4 | 2 | 32 | 26 MP / 52 MP |
| H5 | 5U | 10 | 3 | 48 | 39 MP / 78 MP |
| H9 | 9U | 15 | 5 (10 enhanced) | 80 (160 enhanced) | 65 MP / 130 MP |
| H15 | 15U | 30 | 10 (16 enhanced) | 160 | 130 MP / 260 MP |
| H20 | 20U | 40 | 20 | 320 | 260 MP / 520 MP |
Choose the H5 when…
- You need roughly 40 input channels and up to 78 million pixels of LED loading — more than the 2U H2 can carry, but without paying for a 9U or larger chassis.
- Your wall uses NovaStar receiving and sending hardware, so the H5 integrates without protocol conversion.
- You need mixed inputs — HDMI plus SDI plus IP cameras — on one wall without external switchers.
- You want hardware processing: latency as low as one frame, plus fade and seamless preset switching under 60 ms.
- You need redundancy at device, input-source and sending-card level for a control room that cannot go dark.
- You are standardising a fleet of walls on one processor family; the H Series shares cards, tools and control software, which is why integrators compare the H Series against the VX Series before specifying.
Choose something else when…
- You need more than 12 output channels or more than 48 layers — move up to the H9 or larger.
- You are building a simple single-screen wall driven by one sending card — an all-in-one controller such as the VX4S is smaller and cheaper.
- You are using non-NovaStar LED systems and want native calibration features from the LED brand’s own processor.
- You need the wall itself to run Windows applications or support touch-back interactivity — the H5 processes and displays video, it does not run an operating system for the wall.
9. What Drives the NovaStar H5 Price
Because the H5 is a modular chassis rather than a fixed product, the price is set by the card configuration, not by the chassis alone. Five factors move the number most:
- Input card mix. An HDMI 2.0 card and a 12G-SDI or ST 2110 card are different price points; a wall with six input cards costs materially more than one with two.
- Sending card type. Moving from an H_20xRJ45 card to an H_4xfiber (enhanced) card changes both capacity and cost.
- Output card count. The H5 accepts three output cards; each one adds cost and capability.
- Redundancy. A redundant power supply and backup sending cards add cost but remove a single point of failure.
- Spares and lead time. Projects that cannot afford downtime usually order a spare card set, which is cheaper than an emergency shipment later.
Public reseller listings for a basic H5 configuration generally start in the low four-figure US-dollar range and rise steadily as cards are added; a fully loaded unit with redundant power and several sending cards costs several times more. Treat any published figure as a configuration-specific estimate, not a list price, and confirm the exact card list before ordering — a quotation built on the wrong sending card is the most common specification mistake on H Series projects.
Tell us your wall size, pixel pitch, source list and whether the wall must survive a power or card failure, and we will price a matching H5 configuration — or tell you honestly if a smaller processor does the job.
10. Troubleshooting Common H5 Problems
Most H5 problems on site fall into four groups. Work through them in this order before assuming a hardware fault.
Screen is black but the H5 is powered on
- Output ports are not associated with a virtual screen — check output association first.
- The receiving card is not compatible with the sending card’s output, or the cabinet is patched to a port that was never mapped.
- Cables are in the wrong ports: the control port and the data ports are different, and on fibre links TX/RX matters.
- The screen has not been created on the processor, so no layer can reach it.
No signal on an input
- Resolution or colour depth is above what that connector supports — for example 10-bit 4K@60Hz on a connector that accepts 10-bit 4K@30Hz.
- The source is waiting for an EDID it likes; force a standard EDID preset.
- HDCP or a long passive cable is blocking the handshake; test with a short known-good cable.
- The connector capacity is set higher than the source, which changes how the layer is counted.
Layers, presets or transitions behave unexpectedly
- Presets that exceed 16× SL layers, 8× DL layers, 4× 4K layers or 2× 8K layers switch with a cut instead of a fade — that is a documented limit, not a fault.
- BKG layers do not consume layer resources, so use a background image or pattern rather than a normal layer for a permanent backdrop.
- Backup cannot be configured for NDI or IP camera sources, and mosaic sources cannot be used as a backup input.
Cannot reach the web interface
- Confirm the control port IP (default 192.168.0.10) and that your PC is on the same subnet.
- Check that the HTTP/HTTPS service and device discovery are enabled in the network security configuration — these can be switched off deliberately.
- If a firewall blacklist is active, remove your PC’s IP or MAC range before retrying.
- Half-open connection protection and Ping blocking can make a healthy device look offline to network scanners.
11. FAQs
╸Does the NovaStar H5 support 4K input?
Yes. The H5 accepts native 4K input on the current HDMI 2.0, DP 1.2 and 12G-SDI cards, up to 4096×2160@60Hz at 8-bit or 4096×2160@30Hz at 10-bit. With an HDMI 2.1 input card it accepts up to 8192×4320@30Hz, and with a DP 1.4 card up to 7680×4320@30Hz. Earlier H5 documentation described the legacy H_4xHDMI card (2× HDMI 1.3 + 2× HDMI 1.4), which is limited to 2048×1152@60Hz and 4096×1080@60Hz respectively — if you need 4K input, choose a card from the current list.
╸What is the maximum resolution and pixel capacity of the H5?
Input resolution reaches 8192×4320@30Hz on HDMI 2.1, 4096×2160@60Hz on HDMI 2.0 and 12G-SDI, and 7680×4320@30Hz on DP 1.4. Pixel capacity depends on the LED sending card: 31.2 million pixels with the H_16xRJ45+2xfiber card, 39 million with the H_20xRJ45 card, 62.4 million with the H_4xfiber card and 78 million with the H_4xfiber (enhanced) card.
╸Can I control the H5 without a Windows PC?
Yes for operation. The H5 uses a browser/server architecture, so the web interface works from Windows, Mac, iOS, Android or Linux without installing an application, and firmware can be updated from the web page. NovaLCT — which runs on Windows — is still the standard tool for detailed screen configuration, and the 7-inch front touchscreen plus the VICP tablet app cover most day-to-day switching.
╸Why is my LED wall showing a black screen even though the H5 is powered on?
Work through four checks: whether the output ports are associated with a virtual screen, whether the receiving card is compatible with the sending card, whether the cables are in data ports rather than the control port, and whether the screen has actually been created on the processor. On fibre links, also confirm TX/RX orientation and the OPT port status colour before replacing hardware.
╸Where can I download the NovaStar H5 manual, datasheet and firmware?
The current documents are H5 Video Wall Splicer Specifications V1.17.0 (released 2026-05-30), the H Series Video Wall Splicers User Manual V1.15.0, the H Series Quick Start Guide and the DATA_H firmware package, all published by NovaStar. Always match the revision to your unit, because cards added in V1.15.0 and V1.16.0 do not appear in earlier PDFs. Our team can send the matching datasheet, manual and firmware with your configuration quote.
╸Can I use the H5 for LCD video walls?
Yes, if the LCD tiles accept DVI or HDMI. Use an H_4xDVI or H_4xHDMI output card and connect each output to one tile. The H5 does not provide DisplayPort or USB-C outputs, so LCD arrays that only accept those inputs need a different signal path.
╸What is the H5 rack size, weight and power requirement?
The H5 is a 5U chassis measuring 482.6 × 532.8 × 228.2 mm and weighing 17 kg net, 21.3 kg gross. It runs on 100–240 V~, 50/60 Hz (10 A to 5 A) with 400 W power consumption, and it must be mounted horizontally in a 19-inch rack using eight M5×8 screws on a rack rated for at least four times the equipment weight.
╸How does the H5 differ from the H2 and H9?
The H2 is a 2U chassis with 4 input card slots, 2 output card slots, 32 layers and up to 26 million pixels of loading. The H5 is 5U with 10 input slots, 3 output slots, 48 layers and up to 78 million pixels. The H9 is 9U with 15 input slots and up to 130 million pixels, and the enhanced version doubles that. Choose by card slots, layer count and pixel load rather than by image quality, which is consistent across the family.
12. Conclusion
The NovaStar H5 video wall splicer is the workhorse of the H Series: a 5U, 10-input-card processor with 48 layers and up to 78 million pixels of loading, controlled from a browser, NovaLCT or the front touchscreen, and backed by device, input and sending-card redundancy. Get the card list right — that is what determines both the pixel capacity and the price — and the H5 will run a control room, an exhibition wall or a rental wall for years.
Not sure which sending card your wall needs, or whether the H5 or the smaller H2 fits the budget? Send us your wall size, pixel pitch and source list, and our engineers will specify the configuration, confirm the current datasheet revision and quote it — including a spares recommendation if the wall cannot go dark. We manufacture LED displays and supply NovaStar processing, so the specification and the screen are checked as one system.
Specification sources: NovaStar H5 Video Wall Splicer Specifications V1.17.0 (2026-05-30), NovaStar H Series Video Wall Splicers User Manual V1.15.0, and NovaStar’s official H Series product page. Figures were checked against these documents; where a card option changes a value, the card is named.
Related Posts
NovaStar CVT8-5GS Fiber Converter: Specs, Setup and Manual
The NovaStar CVT8-5GS is a single-mode fiber converter for LED…
NovaStar MX6000 Pro Video Wall Controller: Specs, Price & Manual
NovaStar MX6000 Pro in one paragraph: the NovaStar MX6000 Pro…
NovaStar TB10 Plus: Specifications, Setup and TB20 Plus Comparison
The NovaStar TB10 Plus is an Android 10 multimedia player…

No Comments