
NovaStar TCC160 Control Card: Full Specs, Wiring and Setup Guide
Put simply, the NovaStar TCC160 is an asynchronous, all-in-one LED display control card: one board that combines sending and receiving, plays 4K media, and lets you publish content and monitor the screen remotely from a computer, phone or tablet. NovaStar specifies up to 512×512 pixels @ 60 Hz per card with PWM driver ICs (512×384 with general driver ICs) and up to 650,000 pixels when cards are cascaded, which suits storefronts, vehicle-mounted screens, lamp-post signage, community boards and other small-to-medium pixel-capacity displays.
This guide covers the TCC160’s official specifications, what every connector does, how to wire and set it up, how to read the status LEDs and how it compares with older all-in-one cards such as the Huidu HD-C16C and receiving cards such as the Colorlight 5A-75B. It also links to the related HonghaiLED guides you need when a project outgrows a single asynchronous card.
TCC160 specifications at a glance
| Item | NovaStar TCC160 |
| Product type | Asynchronous full-colour LED display control card (sending and receiving in one board) |
| Capacity per card | 512×512 @ 60 Hz with PWM driver ICs; 512×384 @ 60 Hz with general driver ICs (including ICN1065 and ICN1063); maximum 260,000 pixels per card and maximum 2,048 pixels per side |
| Cascaded capacity | Up to 650,000 pixels (maximum 650,000 pixels per Ethernet port, maximum 2,048 pixels per side) |
| Ultra-long screens | Up to 8,192 pixels wide × 2,048 pixels high |
| Processor and storage | Industrial-grade quad-core 1.4 GHz processor, 2 GB RAM, 32 GB internal storage, hardware 4K video decoding |
| On-board outputs | 16 × HUB75E connectors for LED modules |
| Network and wireless | Fast Ethernet (control) and Gigabit Ethernet LED OUT, 2.4 GHz Wi-Fi with AP and Sta running at the same time, optional 4G module, SIM card slot, UART for a GPS module |
| Control and I/O | USB Type-B (control computer), USB 2.0 Type-A (upgrade, USB playback, storage expansion), 2 × RS485, relay output (maximum DC 30 V / 3 A) |
| Audio | 1 × 3.5 mm audio output, fixed 48 kHz sampling rate |
| Power | DC 5–12 V input, 12 W maximum power consumption |
| Dimensions and weight | 180.9 × 102.3 × 19.4 mm, 149.6 g net weight |
| Operating environment | −40 °C to +80 °C, 0–80% RH non-condensing |
| Certifications | CE, FCC, RoHS, NTRA |
| System software | Android 10 with an Android terminal application and FPGA program |
Source: NovaStar TCC160 Asynchronous Full-Color LED Display Control Card Specifications, document version V1.0.8 (31 July 2026). NovaStar updates documents and firmware, so confirm the revision that applies to your batch before you specify a project.
catalogue
1. What is the NovaStar TCC160 control card?
2. NovaStar TCC160 specifications in full
3. Ports, connectors and wiring
4. How to set up the NovaStar TCC160
5. Status indicators and troubleshooting
6. How much screen can one TCC160 drive?
7. TCC160 vs HD-C16C and 5A-75B
8. Who should choose the TCC160?
9. NovaStar TCC160 FAQs
1. What is the NovaStar TCC160 control card?
The NovaStar TCC160 is an asynchronous full-colour LED display control card from NovaStar’s Taurus family. “Asynchronous” means the screen plays media stored on the card or published to it over a network, instead of needing a live video source connected permanently. The card integrates sending and receiving capabilities, so it drives an LED screen directly through its 16 HUB75E connectors, and it works with cloud-based publishing and monitoring platforms, so an operator can manage the display from any internet-connected computer, phone or tablet.
NovaStar positions the TCC160 for applications that require small pixel capacity — storefront displays, vehicle-mounted displays, community information displays and lamp-post displays — where saving cabinet space, simplifying cabling and keeping maintenance simple matter more than raw pixel count.
Key highlights
- One board replaces the sending card, video processor and receiving card in a small asynchronous screen.
- 16 × HUB75E connectors for direct connection to LED modules.
- Hardware decoding of 4K video, including H.265/HEVC up to 4096×2304 @ 60 fps.
- Wi-Fi AP and Sta active at the same time, plus optional 4G and GPS support.
- USB playback and storage expansion, 2 × RS485 for light or temperature and humidity sensors, and a relay output for scheduled screen power.
- Remote monitoring of temperature, voltage and Ethernet bit errors, with cable mapping to locate cabinets on site.
In short: if you need a self-contained asynchronous controller for a screen up to roughly 260,000 pixels per card, or up to 650,000 pixels with cascaded cards, the TCC160 is built for that job. Above that ceiling a sending card plus receiving card system is the right architecture — see how that compares in the NovaStar VX1000 Pro controller guide.
2. NovaStar TCC160 specifications in full
The table below reproduces the TCC160’s published specification set, so you can check a project against the card’s real limits rather than a marketing summary.
| Category | Specification |
| Pixel capacity (PWM driver ICs) | 512×512 @ 60 Hz per card; maximum width and height 2,048 pixels; maximum 260,000 pixels per card |
| Pixel capacity (general driver ICs) | 512×384 @ 60 Hz per card, including ICN1065 and ICN1063; maximum 260,000 pixels per card |
| Cascading | Maximum 650,000 pixels when multiple TCC160 cards are cascaded; maximum 2,048 pixels width and height per Ethernet port |
| Ultra-long screen | Maximum width 8,192 pixels, maximum height 2,048 pixels |
| Audio output | 1 × 3.5 mm audio connector, fixed 48 kHz sampling rate; audio input is not supported |
| Control ports | 1 × USB 2.0 Type-A (upgrade, USB playback, storage expansion), 1 × USB Type-B (control computer), 2 × RS485 |
| Processing | Industrial-grade quad-core 1.4 GHz processor, hardware decoding of 4K video, 2 GB RAM, 32 GB internal storage |
| Playback capacity | 1 × 4K, 2 × 1080p, 4 × 720p, 4 × 480p or 20 × 360p videos |
| Wireless | Wi-Fi AP and Wi-Fi Sta simultaneously; 4G communication with a separately purchased module; GPS positioning and time synchronisation with a 4G module and GPS antenna; NTP time sync |
| Synchronisation | Synchronous playback across multiple screens; enabling it halves the decoding capability of the device |
| Relay | Maximum DC 30 V, 3 A; the relay supplies no output voltage |
| Receiving card data groups | Up to 32 groups of parallel RGB data or 64 groups of serial data, expandable to 128 groups of serial data |
| Colour management | Standard gamuts (Rec.709 / DCI-P3 / Rec.2020) and custom gamuts |
| Grayscale | 18bit+ processing, improving grayscale by four times at low brightness |
| Latency | Low latency mode down to 1 frame, off by default; requires modules with a driver IC that has built-in RAM |
| Gamma | Individual gamma adjustment for red, green and blue |
| Rotation | Image rotation in multiples of 90°, that is 0°, 90°, 180° and 270° |
| Monitoring | Real-time temperature and voltage monitoring, Ethernet bit-error detection, firmware and configuration readback |
| Diagnostics | Mapping 1.1, where a cabinet displays the controller number, receiving card number and Ethernet port information; dual program backup |
| Electrical | Input voltage DC 5–12 V, maximum power consumption 12 W |
| Environment | Operating and storage −40 °C to +80 °C, 0–80% RH non-condensing |
| Physical | 180.9 × 102.3 × 19.4 mm; net weight 149.6 g; gross weight 348.6 g |
| Certifications | CE, FCC, RoHS, NTRA |
| Operating system | Android 10, with Android terminal application software and FPGA program |
Supported image and video formats
- Images: JPEG and JPG (JFIF 1.02, sRGB and Adobe RGB), BMP, PNG and WEBP from 64×64 to 4096×2304 pixels; GIF from 64×64 to 1920×1088 pixels.
- Video: H.265/HEVC up to 4096×2304 @ 60 fps at 100 Mbps, H.264 up to 4096×2304 @ 30 fps at 60 Mbps, MPEG4 and VP8 up to 1920×1088 @ 60 fps, VP9 up to 4096×2304 @ 30 fps.
- Containers: MP4, AVI, MKV, MOV and WEBM, depending on the codec.
- Storage expansion: USB drive from 2 GB to 128 GB, FAT32 or NTFS, with a single file larger than 0 KB and smaller than 4 GB.
Two practical notes: videos between 2K and 4K are converted to 4K during playback, and enabling synchronous playback across multiple screens halves the decoding capability of the card.
3. Ports, connectors and wiring
Most installation questions about the TCC160 come down to which socket does what. This is the connector map taken from NovaStar’s documentation.
| Connector | What it is | What you connect |
| Power | Power input connector | DC 5–12 V power supply, sized for 12 W maximum consumption |
| HUB75E × 16 | LED module outputs | HUB75E cables to the LED modules |
| LED OUT | Gigabit Ethernet RJ45 without built-in LEDs | Cascading receiving cards or connecting multifunction cards |
| ETHERNET | Fast Ethernet RJ45 with built-in LEDs | Your network or the control computer |
| Wi-Fi Antenna | 2.4 GHz Wi-Fi antenna connector | The bundled omnidirectional Wi-Fi antenna |
| SIM Card | SIM card slot | A SIM card when an optional 4G module is used |
| Audio | 3.5 mm audio output | External audio through a three-pole jack; audio input is not supported |
| USB (Type-A) | USB 2.0 host port | Firmware upgrade, USB playback and USB storage up to 128 GB |
| USB (Type-B) | USB device port | A control computer for content publishing and screen control |
| RS485 × 2 | Serial connectors | Light sensor, temperature and humidity sensor or other modules |
| Relay | 2-pin relay control switch | Remote screen power control, maximum DC 30 V / 3 A |
| UART | Reserved serial port | A third-party GPS module for positioning and time synchronisation |
| RESET | Factory reset button | Hold for 5 seconds to restore factory settings |
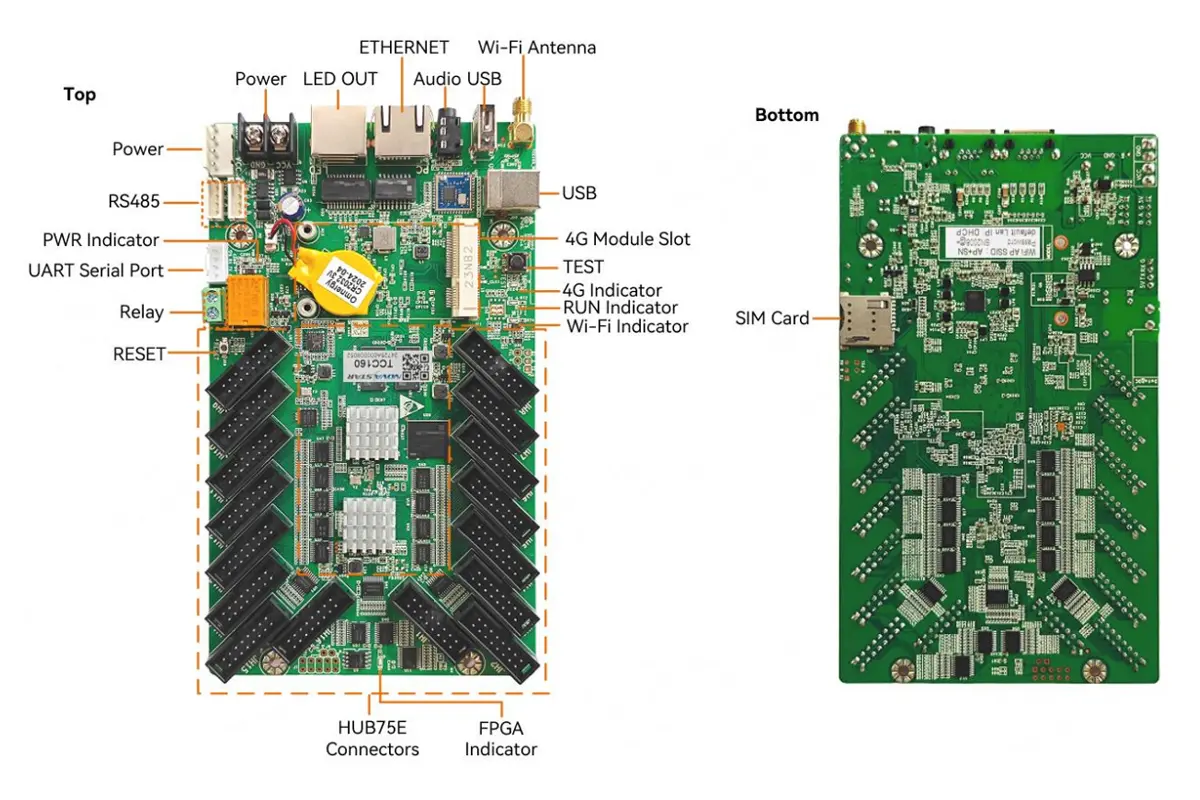
Wiring tips. Keep the supply inside the 5–12 V DC range and size it for the card’s 12 W maximum consumption. Fit the supplied antenna before powering up if you intend to use Wi-Fi. Use the ETHERNET port for commissioning and the LED OUT port for cascading, and label the cables as you run them, because the receiving card’s mapping function uses the same port numbering when you need to find a cabinet later. For the module-side connections, our guide to connecting a NovaStar controller to the control computer covers the same NovaLCT workflow in more detail.
4. How to set up the NovaStar TCC160
Setup follows six steps: power and cabling, first connection, screen configuration, content publishing, remote access and monitoring.
Step 1: Connect the hardware
- Power: connect a 5–12 V DC supply to the Power connector.
- Screen: run HUB75E cables from the card’s 16 HUB75E connectors to your LED modules.
- Network, choose one: an Ethernet cable from your router or switch to the ETHERNET port, or the supplied Wi-Fi antenna on the Wi-Fi Antenna connector.
Step 2: Make the first connection
- Power on the card. The red PWR indicator lights up when the power supply is working correctly, and the green SYS indicator flashes once every 2 seconds when the system is functioning normally.
- On a phone, tablet or computer, look for a Wi-Fi network whose SSID is the model name plus the last 8 digits of the serial number — for example TCC160 followed by the last 8 digits printed on the product label. The default password is printed on the SSID label.
- Connect, then open NovaLCT on your computer to discover and configure the card, or use the supported mobile app for quick publishing.
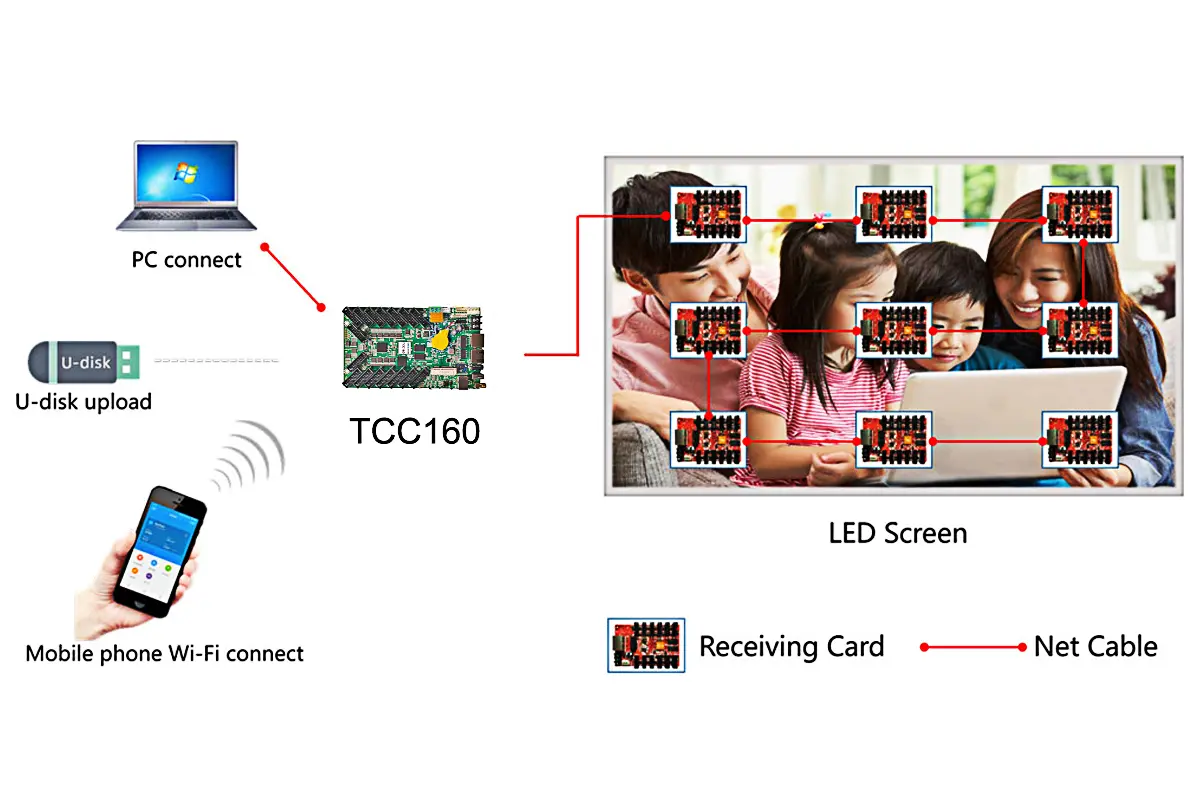
Step 3: Configure the screen and publish content
- In NovaLCT, set the screen parameters such as resolution, module type and data group configuration to match the hardware you installed.
- Build a playlist with your images and videos, then publish it to the card. Content can also be loaded from a USB drive.
- Check the RUN indicator: flashing once per second means the receiving card is working, the Ethernet cable connection is normal and there is a video input.
Step 4: Add remote access
- Configure Wi-Fi Sta mode so the card joins the site network, or fit a separately purchased 4G module and SIM card where no wired or Wi-Fi network exists.
- Wi-Fi AP and Sta can run at the same time, so an installer can stay connected locally while the screen is also online.
Step 5: Publish and monitor from the cloud
- Register the screen with NovaStar’s cloud-based publishing and monitoring platform, then publish from any internet-connected device.
- Monitor temperature, voltage and Ethernet bit errors remotely, and use the relay output to schedule power on and off so the display runs only when it needs to.
Step 6: Fine-tune the image
- Adjust individual red, green and blue gamma, apply 18bit+ grayscale enhancement and select a standard or custom colour gamut such as Rec.709, DCI-P3 or Rec.2020.
- Rotate the image in 90° steps if the cabinets are mounted sideways, and enable low latency only when your modules use a driver IC with built-in RAM.
5. Status indicators and troubleshooting
Five LEDs tell you almost everything about the state of the card. This is the official indicator behaviour.
| Indicator | Status | Meaning |
| PWR (red) | Staying on | The power supply is working properly |
| 4G (green) | Staying on | Network connection and device communication are normal |
| 4G (green) | Flashing once per second | The SIM card is abnormal |
| 4G (green) | Off | No 4G module detected |
| SYS (green) | Flashing once every 2 s | The system is functioning normally |
| SYS (green) | Staying on or off | The system is malfunctioning |
| WiFi (green) | Flashing once every 2 s | Wi-Fi Sta is configured and connected to a Wi-Fi network |
| WiFi (green) | Staying on | Wi-Fi Sta is turned on but no Wi-Fi network is connected |
| WiFi (green) | Off | Wi-Fi Sta is turned off |
| RUN (green) | Flashing once per second | Receiving card working, Ethernet cable connection normal, video input present |
| RUN (green) | Flashing 3 times every 0.5 s | Ethernet cable connection normal but no video input |
| RUN (green) | Flashing once every 0.2 s | Loading of the program in the application area failed and the backup program is running |
| RUN (green) | Staying on or off | FPGA loading is abnormal |
Fast diagnosis. No image while RUN flashes three times every half second points to a content or configuration problem rather than a cabling problem. A dark PWR LED means the supply is outside the 5–12 V DC range or the wiring is reversed. SYS staying on or off is a system fault, so hold RESET for 5 seconds to restore factory settings and then re-import the screen configuration. A WiFi LED that stays on solid usually means the network name or password has changed, not a hardware failure.
6. How much screen can one TCC160 drive?
Capacity is the question that decides whether the TCC160 fits a project, so it is worth working through the numbers before ordering.
| Scenario | Limit |
| One card with PWM driver ICs | 512 × 512 @ 60 Hz |
| One card with general driver ICs | 512 × 384 @ 60 Hz |
| Maximum per card | 260,000 pixels, maximum 2,048 pixels per side |
| Cascaded cards | 650,000 pixels maximum, 2,048 pixels per side per Ethernet port |
| Ultra-long screens | 8,192 × 2,048 pixels |
Multiply the horizontal and vertical pixel count of the screen you plan to build and compare it with those figures. A 6 m × 3 m P4 screen, for instance, is 1,500 × 750 pixels, or 1,125,000 pixels, which is beyond both a single card and the 650,000-pixel cascading limit, so that project belongs on a sending card with receiving cards instead. A 3 m × 1.5 m P4 screen is 750 × 375 pixels, or 281,250 pixels, so it exceeds one card and needs two cascaded TCC160 units. Ultra-long strip displays, such as lamp-post or shelf signage, are where the TCC160’s 8,192-pixel width limit is genuinely useful. For larger video walls, compare the alternatives in our NovaStar H Series vs VX Series and VX1000 Pro vs VX1000 guides.
7. TCC160 vs HD-C16C and 5A-75B
The TCC160 replaced a generation of all-in-one asynchronous cards and receiving cards that installers still encounter on site. Here is how the published specifications differ.
| Feature | NovaStar TCC160 | Huidu HD-C16C | Colorlight 5A-75B |
| Product type | Integrated sending and receiving | Integrated sending and receiving asynchronous card | Dedicated receiving card, needs a separate sender |
| Pixel capacity per card | 512×512 @ 60 Hz with PWM ICs, 512×384 @ 60 Hz with general ICs; maximum 260,000 pixels | 122,880 pixels (384×320) in Huidu’s published specification | 256×256 pixel control and correction area, loadable up to 192×1024 pixels |
| Maximum width and height | 2,048 × 2,048 pixels per card; 8,192 × 2,048 pixels for ultra-long screens | 8,192 pixels wide and 512 pixels high in Huidu’s published specification | Determined by the sending system and card count |
| Cascading | Up to 650,000 pixels | Supported within the card family; confirm the current limit with the vendor | Designed for cascading in large walls, one card per cabinet area |
| Processing and memory | Quad-core 1.4 GHz, 2 GB RAM, 32 GB storage | 4 GB memory, expandable through USB | None, it relies entirely on the sending system |
| Video decoding | Hardware 4K decoding, H.265/HEVC to 4096×2304 @ 60 fps | HD video hardware decoding with 60 Hz output | Not applicable, video is processed by the sending system |
| Connectivity | Fast Ethernet, Gigabit LED OUT, dual Wi-Fi AP and Sta, optional 4G and GPS | Ethernet LAN, Wi-Fi app control, USB | Two Ethernet ports for data in and cascade out |
| Remote management | Cloud publishing and monitoring with temperature, voltage and bit-error reporting | App and network-based management; cloud support varies by model | No cloud layer of its own |
| Best fit | New small and medium asynchronous screens, retrofits, vehicle-mounted and lamp-post displays that need remote publishing | Existing installs already built on Huidu’s ecosystem | Large or high-refresh-rate video walls driven by a processor |
Comparison figures for the HD-C16C and 5A-75B come from those manufacturers’ published specifications and can change with hardware revision or firmware, so confirm the current datasheet with the vendor before you specify a project. Within NovaStar’s own range, the TB series covers larger asynchronous screens and the VX series covers processing and video walls, which is why it is worth reading our NovaStar TB10 Plus setup guide and TB30 guide before deciding.
8. Who should choose the TCC160?
Choose the TCC160 when the screen is a single, self-contained asynchronous display; the pixel budget fits inside 260,000 pixels per card or 650,000 pixels cascaded; you need content published remotely without a PC on site; the installation is space constrained, such as a lamp-post cabinet, a shop window or a vehicle-mounted screen; or you want straightforward sensor and relay integration through RS485 and the relay output.
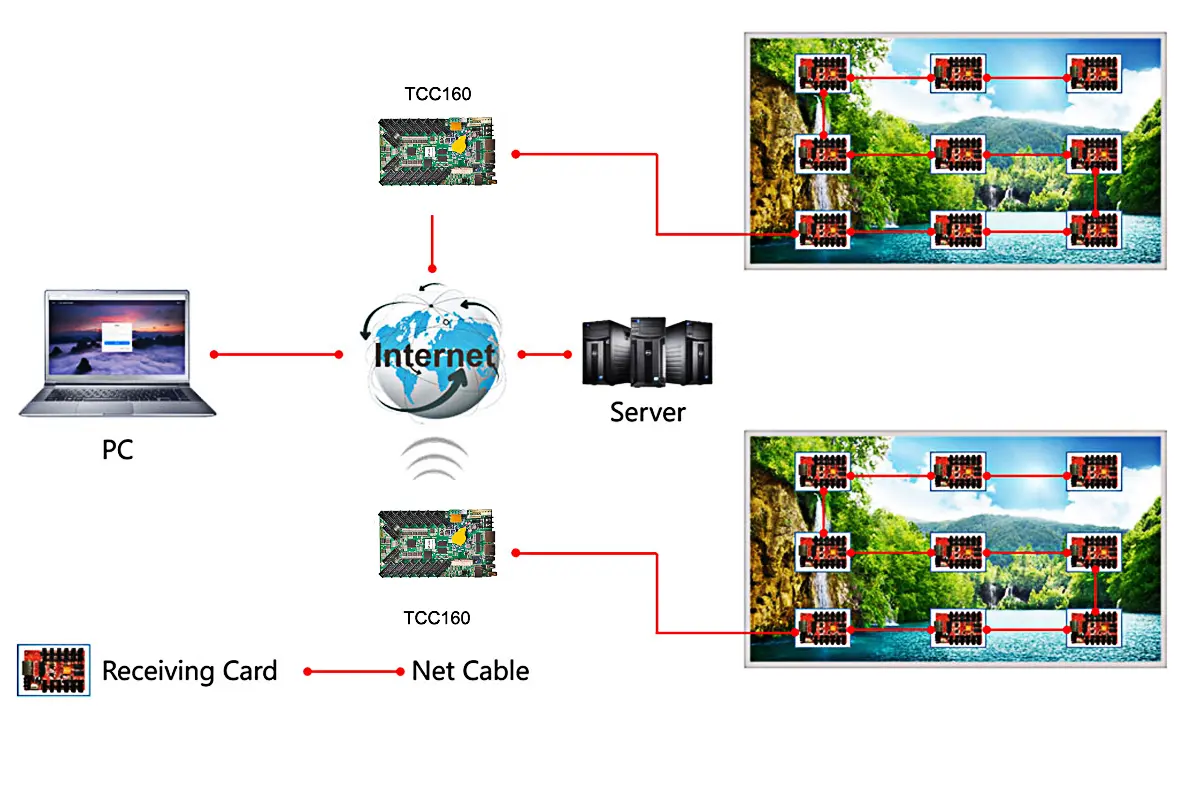
Look elsewhere when the screen exceeds the cascading limit, when the job needs multiple live video inputs, or when a video wall must run at full decoding capacity with synchronised playback across several screens. Those projects belong on a sending card or video processor with receiving cards, for example the NovaStar VX1000 Pro combined with MRV412-N receiving cards, or a proven sending card such as the MSD600.
Typical TCC160 installations include retail storefront windows that update promotions from head office, vehicle-mounted and public transit displays that publish over 4G while on the move, community and corporate information boards that power themselves on and off on a schedule, and lamp-post or other digital out-of-home cabinets where space inside the cabinet is at a premium. In each case the value comes from publishing remotely without a computer on site and from monitoring hundreds of screens from a single dashboard.
If you are comparing software rather than hardware, our Viplex Express overview explains the publishing tools used with asynchronous cards, and the commercial LED display buyer’s checklist covers the specification questions to settle before you order a screen.
9. NovaStar TCC160 FAQs
▬ What is the maximum pixel capacity of the NovaStar TCC160?
A single TCC160 drives 512×512 pixels @ 60 Hz with PWM driver ICs or 512×384 pixels @ 60 Hz with general driver ICs, up to a maximum of 260,000 pixels with a maximum of 2,048 pixels per side. Cascading several cards raises the limit to 650,000 pixels, and ultra-long screens can reach 8,192 × 2,048 pixels.
▬ Does the TCC160 need a separate sending card or video processor?
No. The TCC160 is an asynchronous control card that integrates sending and receiving in one board, so it connects straight to LED modules through its 16 HUB75E connectors. You only need a separate sending card and receiving cards once the pixel count or the video requirements exceed what an asynchronous card can handle.
▬ What power supply does the TCC160 require?
The card accepts DC 5–12 V and consumes a maximum of 12 W. Keep the supply inside that voltage range and size it with headroom for the LED modules and for any 4G module you add.
▬ Can the TCC160 play 4K video?
Yes. It decodes 4K video in hardware, supporting H.265/HEVC up to 4096×2304 @ 60 fps and H.264 up to 4096×2304 @ 30 fps, and it can play one 4K, two 1080p, four 720p, four 480p or twenty 360p videos at the same time. Videos between 2K and 4K are converted to 4K for playback.
▬ Is 4G included with the TCC160, and what is it for?
No. The card ships without a 4G module, which has to be purchased separately, and the SIM slot accepts a SIM card once the module is fitted. 4G gives a screen internet access where no wired or Wi-Fi network exists, and GPS positioning and GPS time synchronisation additionally require a 4G module and a GPS antenna.
▬ How do I connect to the TCC160’s Wi-Fi and what is the default password?
In Wi-Fi AP mode the default SSID is the model name followed by the last 8 digits of the card’s serial number, and the default password is printed on the SSID label attached to the product. Wi-Fi AP and Sta can run at the same time, so you can stay connected locally while the screen is also joined to the site network.
▬ What software do I need to configure the TCC160?
NovaLCT is used for discovery, screen configuration and content publishing from a computer, while the supported mobile app or NovaStar’s cloud-based publishing platform is used for remote publishing and monitoring. The card runs Android 10 with an Android terminal application and an FPGA program.
▬ What certifications does the NovaStar TCC160 have?
NovaStar lists CE, FCC, RoHS and NTRA for the TCC160. If a country or region requires additional certification, confirm the requirement with the supplier before ordering.
▬ How do I reset the TCC160 to factory settings?
Press and hold the RESET button for 5 seconds. The device restores its factory settings, so export or note the screen configuration first if you may need to reapply it.
Sources and verification. The TCC160 specifications in this guide are taken from NovaStar’s official TCC160 Asynchronous Full-Color LED Display Control Card Specifications, document version V1.0.8 dated 31 July 2026, together with NovaStar’s product documentation for the Taurus series. Comparative figures for the Huidu HD-C16C and Colorlight 5A-75B are taken from those manufacturers’ published specifications. Hardware revisions, firmware versions and regional variants can change published values, so confirm the current datasheet with the manufacturer or your supplier before you specify or purchase hardware.
Related Posts
NovaStar CVT8-5GS Fiber Converter: Specs, Setup and Manual
The NovaStar CVT8-5GS is a single-mode fiber converter for LED…
NovaStar MX6000 Pro Video Wall Controller: Specs, Price & Manual
NovaStar MX6000 Pro in one paragraph: the NovaStar MX6000 Pro…
NovaStar H5 Video Wall Splicer: Specs, Setup & Manual
The NovaStar H5 video wall splicer is a 5U, modular…

No Comments