
NovaStar VX600 Pro: Specs, Manual, Setup & Layer Guide
Novastar VX600 Pro isn’t just a video wall controller—it’s the command center for professional LED video walls. This guide cuts through the complexity to give you clear, actionable steps for initial setup, advanced layer management and precise screen configuration, so you can deploy, control and scale your displays with confidence. NovaStar also writes its brand name as “Novastar” or “Nova Star”; all three refer to the same LED display control equipment.
Quick answer: The NovaStar VX600 Pro is an all-in-one 4K LED display controller with 6 Gigabit Ethernet ports, a 3.9-million-pixel loading capacity, a maximum output width of 10,240 pixels and a maximum height of 8,192 pixels, and 6× 2K×1K layer resources. It combines video processing, input switching, layer compositing and output management in a single rack-mount chassis, and it can be controlled from the front panel, NovaLCT, the Unico web page or the VICP app.
Contents
1. NovaStar VX600 Pro overview and specifications
2. Key features of the NovaStar VX600 Pro
3. Getting started: VX600 Pro setup steps
4. Creating and managing layers on the VX600 Pro
5. Configuring screen resolution and physical layout
6. Using multiple input sources in one display layout
7. VX600 Pro manual, datasheet, firmware and software
8. VX600 Pro vs VX400 Pro, VX1000 Pro and VX2000 Pro
9. FAQs
10. Conclusion
1. NovaStar VX600 Pro overview and specifications
Novastar VX600 Pro is a true all in one controller: it integrates video processing, input switching, layer compositing and output management into a single industrial chassis, eliminating the need for external scalers, switchers or backup devices. Whether you are deploying a fixed installation or managing a touring show, the VX600 Pro delivers reliability, flexibility and pixel-perfect control. NovaStar positions it for medium and high-end rental, stage control systems and fine-pitch LED screens.
VX600 Pro specifications at a glance:
| Specification | VX600 Pro |
| Product type | All-in-one LED display controller combining video processing and video control |
| Loading capacity | 3.9 million pixels |
| Maximum output size | 10,240 pixels wide × 8,192 pixels high |
| Ethernet output ports | 6× Gigabit Ethernet, 650,000 pixels per port (8-bit input) |
| Layer resources | 6× 2K×1K. A 4K×2K layer uses 4 resources, a 4K×1K layer uses 2 and a 2K×1K layer uses 1 |
| Working modes | Video controller, fiber converter and ByPass |
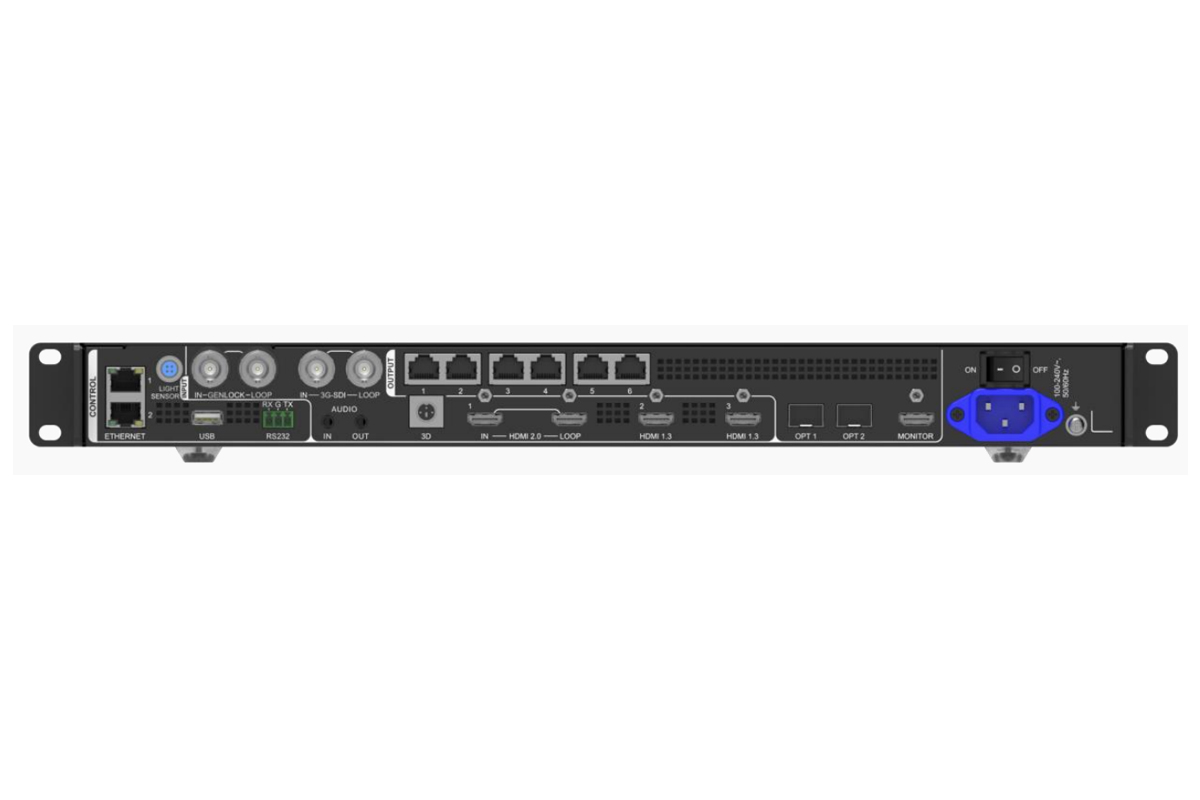
| Video inputs | 1× HDMI 2.0 (IN & LOOP), 2× HDMI 1.3, 1× 3G-SDI (IN & LOOP), 1× 10G optical fiber (OPT 1, self-adaptive input or output), 1× USB 3.0 media playback |
| Maximum input resolution | 4096×2160@60Hz over HDMI 2.0; 1920×1080@60Hz over HDMI 1.3 and 3G-SDI |
| HDCP | HDCP 1.4 and HDCP 2.2 over HDMI 2.0; HDCP 1.4 over HDMI 1.3 |
| Video outputs | 6× Gigabit Ethernet; 2× 10G optical fiber (OPT 1 output, OPT 2 copy, backup or loop output); 1× HDMI 1.3 monitoring output at 1920×1080@60Hz; 1× 3D connector |
| Fiber transmission distance | Up to 10 km with a single-mode twin-core module, up to 300 m with a multi-mode twin-core module (optical module optional) |
| Audio | 1× 3.5 mm audio input and 1× 3.5 mm audio output, sampling rate up to 48 kHz; audio accompanied with HDMI sources; adjustable output volume |
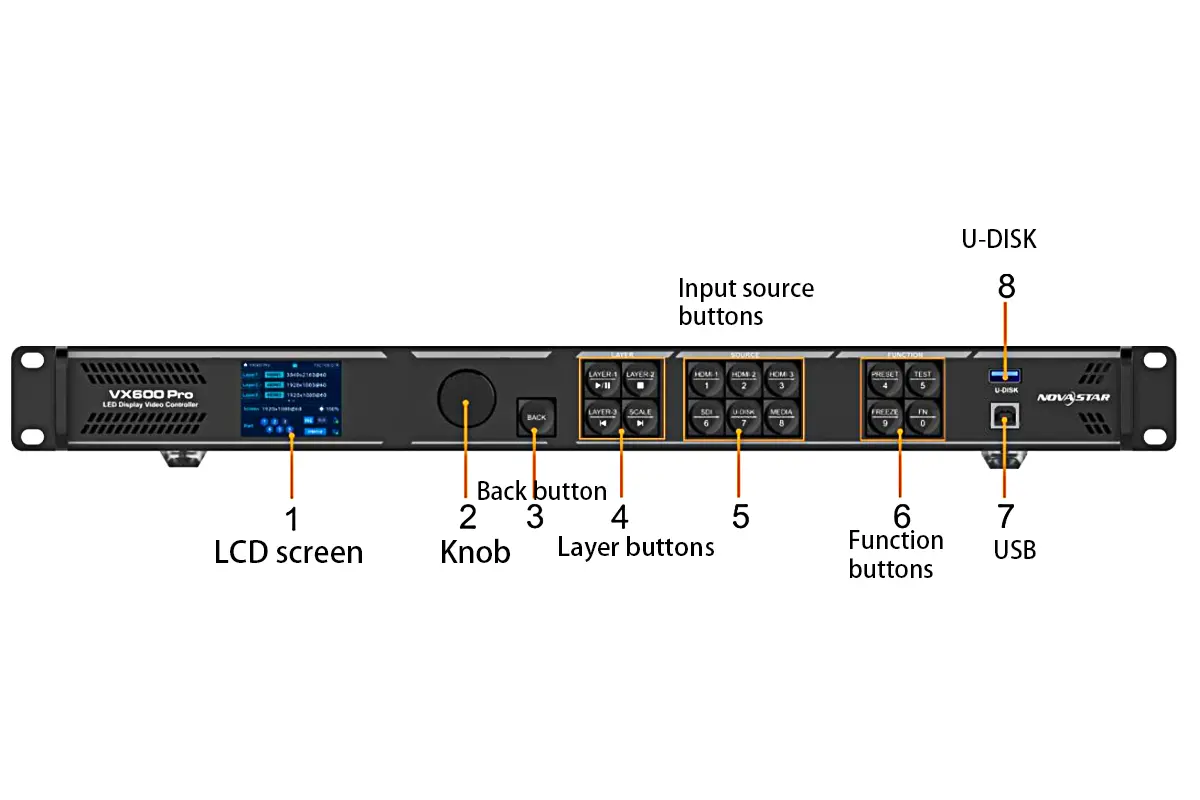
| Control | Front panel LCD with knob, NovaLCT, Unico web page and VICP app; 2× Ethernet for Unico control and cascading; 1× USB 2.0 for firmware, logs and EDID; 1× RS232; 1× Genlock IN/LOOP; 1× light sensor |
| Presets | Up to 256 user-defined presets with one-button loading and layout preview |
| Latency | 1–2 frames in video controller mode with low latency enabled (2–3 frames without); 0 frames in ByPass and fiber converter mode |
| USB playback | Single-partition drive, NTFS / FAT32 / exFAT; jpg, jpeg, png and bmp images; mp4 video with H.264 up to 3840×2160@30fps or H.265 up to 3840×2160@60fps; AAC-LC audio |
| Backup and reliability | End-to-end backup between devices, input sources, Ethernet ports and OPT/Ethernet ports; Ethernet port backup testing; saved settings restored automatically after a power failure |
| Power | 100–240 V~, 50/60 Hz; rated power consumption 41 W |
| Operating environment | 0 °C to 50 °C, 5% to 85% RH non-condensing |
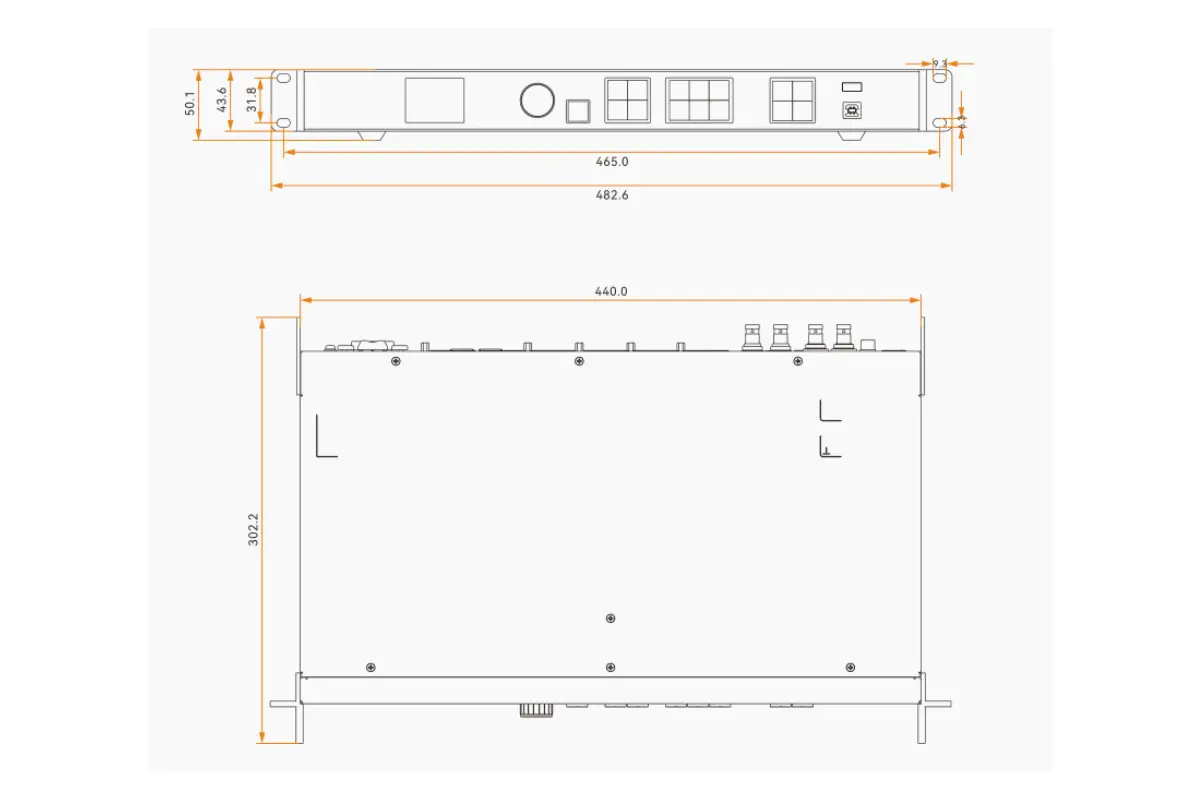
| Dimensions | 482.6 × 302.2 × 50.1 mm |
| Weight | 3.9 kg net weight, 6.5 kg total weight |
| Certifications | CE, FCC, IC, RCM, EAC, UL, CB, KC, RoHS |
Source: NovaStar VX600 Pro All-in-One Controller Specifications, document version V1.0.1, released 5 March 2025. Where a feature depends on third-party hardware — such as specific receiving cards, 3D glasses or optical modules — the condition is stated in the specification.
 |
 |
 |
 |
2. Key features of the NovaStar VX600 Pro
The VX600 Pro stands out as a powerful all in one controller, integrating advanced features that suit both first-time users and seasoned professionals. Below we break down its core capabilities.
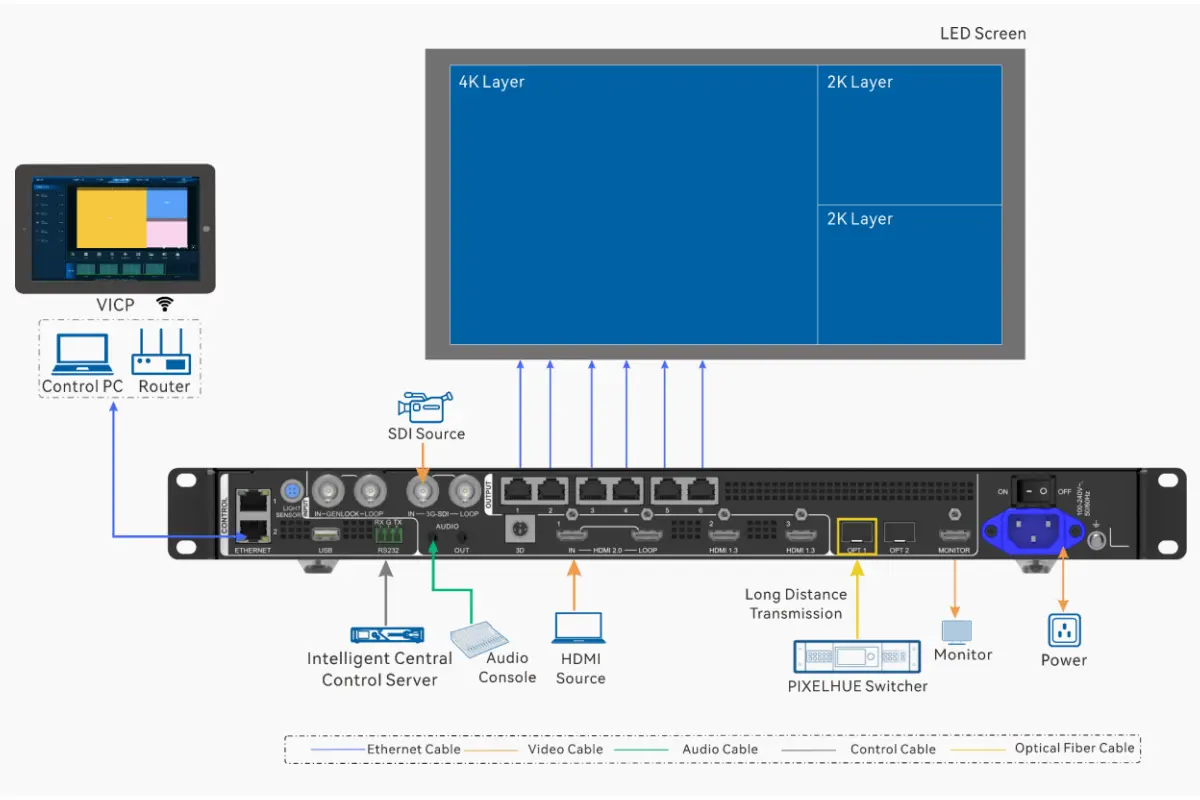
Video input and output capabilities
The VX600 Pro accepts multiple video inputs — HDMI 2.0, HDMI 1.3, 3G-SDI, 10G optical fiber and USB 3.0 media playback — and processes them through the same internal pipeline. The self-adaptive OPT 1 port can serve as either an input or an output connector depending on what you plug into it, which removes the need for a separate fiber converter in most signal chains.
Key highlights:
- HDMI 2.0: up to 4096×2160@60Hz, with 8-, 10- and 12-bit input, RGB 4:4:4 / YCbCr 4:4:4 / YCbCr 4:2:2 sampling, HDCP 1.4 and HDCP 2.2, and HDMI 2.0-1 loop out.
- HDMI 1.3 (×2): up to 1920×1080@60Hz with HDCP 1.4, ideal for laptops, media players and confidence monitors.
- 3G-SDI: up to 1920×1080@60Hz with deinterlacing and loop output, for broadcast cameras and production routers.
- 10G optical fiber: transmits the output of Ethernet ports 1–6 up to 10 km on a single-mode twin-core module, or copies and backs up that output.
- USB 3.0: instant playback of images and video straight from a USB drive, with no PC attached.
Layer management features
Layer capacity is measured in 2K×1K layer resources, and the VX600 Pro provides 6 of them. You can create layers in three specifications — 4K×2K (4 resources), 4K×1K (2 resources) and 2K×1K (1 resource) — so a single 4K layer plus two 2K layers, or six 2K layers, both fit inside the same budget. Each layer’s size, position, priority and aspect ratio can be adjusted independently.
Key features include:
- 6× 2K×1K layer resources: build picture-in-picture, split-screen and multi-camera layouts in real time.
- Free input cropping: trim black borders or isolate one region of a source.
- Image scaling modes: full screen, pixel to pixel and custom.
- Text and image elements: add text, image, weather and time elements across the VX Pro series, with customisable settings.
Video processing, colour and calibration
The VX600 Pro uses SuperView III image quality processing with stepless output scaling and one-click full screen display. Output colour management covers brightness, saturation, contrast and hue, and brightness and chroma can be calibrated at pixel level when the device is used together with NovaLCT and NovaStar calibration software. That calibration step is what removes colour discrepancies between cabinets on a large fine-pitch wall.
Audio input and output functions
In addition to its video capabilities, the VX600 Pro provides comprehensive audio support:
- Accompanied audio: follows the HDMI source automatically.
- Independent audio: 3.5 mm audio input and output jacks for external mixers and consoles, with sampling rates up to 48 kHz.
- Volume control: output volume is adjustable from the device front panel.
Control options
There are four ways to operate the VX600 Pro, so you are not tied to a laptop on site:
- Front panel: LCD screen, rotary knob, layer buttons and shortcut keys (PRESET, TEST, FREEZE, FN).
- NovaLCT: the PC application for screen configuration, cabinet library, receiving card mapping, layer control and calibration.
- Unico web page: browser-based control over the device Ethernet control ports.
- VICP app: mobile control and monitoring.
Hold the knob and the BACK button together for three seconds or longer to lock or unlock the front panel buttons — useful when a device is installed in a public or accessible position.
3. Getting started: VX600 Pro setup steps
Setting up the VX600 Pro involves connecting the necessary cables, configuring basic settings through the front panel or NovaLCT, and ensuring proper communication between the controller and the LED screen.
Initial steps:
- Mount the device: the VX600 Pro is a 482.6 × 302.2 × 50.1 mm unit with a 3.9 kg net weight. It must be placed horizontally — do not mount it vertically or upside down. If you rack-mount it, use at least eight M5×8 screws and make sure the rack can carry at least 15 kg.
- Connect power: use the supplied power cord with a 100–240 V~, 50/60 Hz supply. Rated consumption is 41 W.
- Attach input sources: plug in HDMI, SDI or fiber optic cables based on your project requirements.
- Link Ethernet ports: connect the six Gigabit Ethernet ports to the corresponding LED cabinets through your receiving cards.
- Power on: press the power button and wait for the system to initialise. Previously saved settings are restored automatically after a power failure.
Once powered on, use the front panel knob to navigate the LCD menu and configure essential parameters such as brightness, input source and EDID settings. For multi-layer work, connect a control PC to one of the Ethernet control ports and continue in NovaLCT.
4. Creating and managing layers on the VX600 Pro
Layer management is one of the strengths of the Novastar VX600 Pro as a professional video wall controller. With 6× 2K×1K layer resources it enables dynamic compositions such as picture-in-picture, live score overlays or multi-camera monitoring, all processed in real time inside this all in one controller.
You can create and adjust layers using NovaLCT (NovaStar’s PC software), the front-panel LCD menu, the Unico web interface or the VICP app. The following steps walk you through the essential workflow.
Step 1: Access layer settings
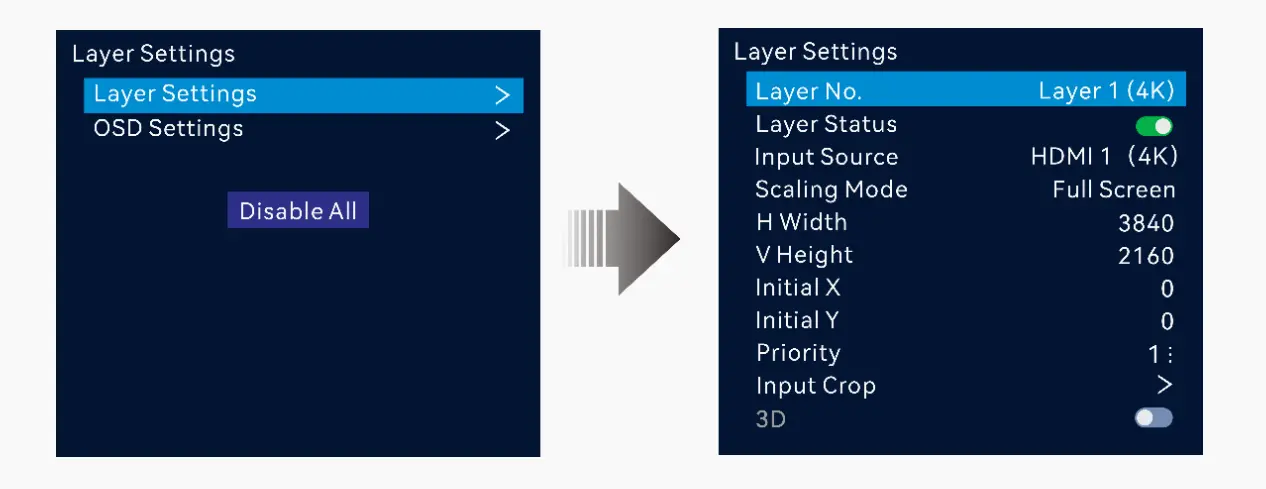
Start by entering the layer management section. In NovaLCT, go to the Screen tab, select Layer Management and click Add Layer. If you are working directly on the device, rotate the front-panel knob to navigate to System Settings > Layer Settings and choose Add Layer, or press one of the LAYER 1–3 buttons on the front panel. Each new layer must be linked to an active input source — such as HDMI 1, SDI or internal USB playback.
Step 2: Configure layer properties
Once a layer is created, define its visual behaviour. Assign the input source, then adjust its size and on-screen position using X/Y coordinates or drag-and-drop in NovaLCT. Set the layer’s priority (Z-order) to control which content appears on top — critical when overlapping graphics and video. Choose a scaling mode: Full Screen stretches the source, Pixel-to-Pixel preserves the original resolution, and Custom lets you fine-tune the aspect ratio without distortion.
Step 3: Fine-tune display and source details
Enhance visual quality with per-layer colour adjustments — brightness, contrast, saturation and hue — to match other layers or correct source inconsistencies. Use the input crop function to trim black borders or zoom into a specific region of the source, for example isolating a presenter from a wide shot. Text and image elements such as event names or channel IDs can be placed over any layer through the preset and element controls.
Keep in mind that the VX600 Pro allocates layer resources by resolution: a 4K×2K layer consumes four of the six 2K×1K resources, a 4K×1K layer consumes two and a 2K×1K layer consumes one. Plan your layout to stay within the budget and avoid resource warnings.
Example workflow:
| Action | Description |
| Add layer | Create a layer and assign an input source such as HDMI 2.0, SDI or USB. |
| Set priority | Higher priority layers appear above lower ones — adjust for layered visuals. |
| Set scaling | Full screen, pixel to pixel or custom, depending on how the source should fill the layer. |
| Save a preset | Store the layout in one of the 256 presets so the whole scene can be recalled with one button. |
5. Configuring screen resolution and physical layout
Correctly setting your screen’s resolution and physical layout is essential for the VX600 Pro to display content across the full LED wall. This configuration is done in NovaLCT, NovaStar’s official control software.
Remember the loading limits while you plan: 3.9 million pixels in total, a maximum output width of 10,240 pixels, a maximum height of 8,192 pixels and 650,000 pixels per Ethernet port at 8-bit input. The maximum circumscribed rectangle of the screen must stay inside the device capacity, and the VX600 Pro loads cabinets without a rectangle restriction on each individual port, which improves port utilisation on irregular or creative screens.
Step 1: Define your cabinet type
Open NovaLCT and go to Screen > Cabinet Library. Click Add to create a new cabinet model. Enter:
- Cabinet width and height in pixels (for example 256 × 256).
- Scan type (for example 1/8 or 1/16 — check your receiving card specifications).
- Save the cabinet. You only need to do this once per cabinet type.
Step 2: Set total screen size
In Screen Configuration, select the cabinet you just created. Then enter:
- Cabinet row quantity: the number of cabinets stacked vertically.
- Cabinet column quantity: the number of cabinets placed horizontally.
The software calculates the total screen resolution automatically (for example, 10 cabinets × 256 px = 2560 px wide).
Step 3: Assign the starting port and direction
Under Quick Configuration, set:
- Starting port: usually Port 1 (it must match your physical first connection).
- Data flow (front view): choose the direction that matches your cabling — typically left to right, top to bottom.
If your screen starts from a different corner, for example bottom-left, adjust accordingly. A wrong setting causes the image to appear flipped or offset.
Step 4: Preview and verify
Click Preview to see a simulated output, then press Send to apply the layout to the VX600 Pro through NovaLCT. If your receiving cards support it, use Mapping mode to light up each cabinet with its logical ID — this confirms your software layout matches the physical wiring. The device also includes an Ethernet port backup test that checks pre-stored images, backup Ethernet ports and backup devices without unplugging any cables.
Once complete, any input source scales correctly across the entire screen. Do this step before layer management, because layers and advanced effects only display correctly on a correctly configured screen.
6. Using multiple input sources in one display layout
Novastar VX600 Pro lets you combine up to six input sources — HDMI cameras, SDI feeds, USB media players, computers or fiber signals — into a single cohesive display using its layer system. No external switchers or scalers are needed.
Step 1: Connect all input sources
Plug your devices into the available ports:
- HDMI 2.0: for 4K computers, media servers and cameras (up to 4096×2160@60Hz).
- HDMI 1.3 (×2): for laptops, media players and confidence monitors.
- 3G-SDI: for broadcast cameras and professional video routers.
- OPT (optical fiber): for long-distance transmission, or to copy and back up the output.
- USB 3.0 playback: load mp4 video or images directly from a USB drive.
Ensure each source is powered on and outputting a valid signal before proceeding.
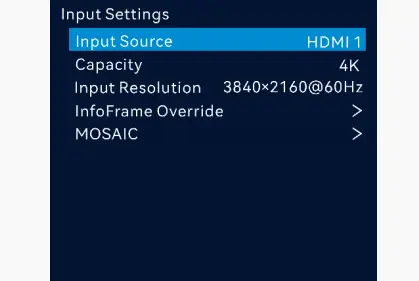
Step 2: Create a layer for each source
In NovaLCT, go to Screen > Layer Management and click Add Layer for each input:
- Set Source to the corresponding port (for example HDMI 1, SDI or USB).
- Adjust Position and Size to place the window where you want it.
- Set Priority (Z-order) so important content stays on top.
You can mix resolutions — for example a 4K HDMI feed as the background with a 1080p SDI camera in a picture-in-picture window. Remember the resource cost: that combination uses 4 + 1 = 5 of the six 2K×1K layer resources.
Step 3: Optimise scaling and crop
For each layer, choose a scaling mode:
- Full screen: scales the source to fill the layer area.
- Pixel to pixel: keeps the original resolution and adds black bars where needed.
- Custom: manually adjust scale, offset and aspect ratio.
Use Input Crop to zoom into a region of interest, such as cropping a 4K desktop to show only a specific application window.
Step 4: Manage audio (if needed)
Only one audio source can be output at a time. In System Settings > Audio, select:
- Accompanied audio: follows the currently active HDMI layer.
- Independent audio: use the 3.5 mm input for external mixers and consoles.
Output volume can be adjusted from the front panel.
Tip: if the picture behaves unexpectedly, check the function limitations in the specification first. 3D mode and input crop are mutually exclusive, low latency requires that all cabinets loaded by Ethernet ports are aligned at the top of the circumscribed rectangle, and in ByPass mode the video processing function is unavailable. Also make sure total capacity stays inside 3.9 million pixels.
7. VX600 Pro manual, datasheet, firmware and software
NovaStar documents the VX600 Pro in several places. Knowing which document answers which question saves a lot of time on site — and it matters, because the summaries printed on retailer listings are often incomplete or out of date.
- Quick Start Guide (supplied in the box): unpacking, connector layout and first power-up. The box also contains a power cord, Ethernet cable, HDMI cable, USB cable, two silicone dustproof plugs, a Phoenix connector, a Certificate of Approval — and the guide itself.
- VX600 Pro All-in-One Controller Specifications (document V1.0.1, released 5 March 2025): the complete technical reference. It covers every connector, supported resolution and frame rate, the layer resource rules, the latency table, function limitations, rack-mounting requirements and physical specifications. The specification tables on this page summarise that document.
- NovaLCT: the PC software used to build the screen, load the cabinet library, map receiving cards, manage layers and run pixel-level brightness and chroma calibration.
- Unico web page: browser-based device control and monitoring, reached over the device’s Ethernet control ports — useful when you only have a browser available.
- VICP app: mobile control and monitoring of the device.
- Firmware updates: copy the firmware file to a USB drive and update the device through its USB port. Single-partition drives formatted as NTFS, FAT32 or exFAT are supported.
HonghaiLED publishes NovaStar control software links and setup notes on our own NovaStar LED control software page, and we keep practical setup walkthroughs for the wider platform in our H9 video wall splicer guide and CVT8-5GS fiber converter guide.
One caution about documentation: always take firmware and control software from the manufacturer’s official distribution for your region. Firmware built for a different hardware revision can leave a controller unusable mid-show, and the correct build depends on the device batch. If you are unsure which revision you have, check the label on the unit and confirm with your supplier before updating. For hardware questions — receiving card compatibility, cabinet loading limits, or whether the VX600 Pro fits a specific stage — talk to our engineers and we will confirm against the current specification.
8. VX600 Pro vs VX400 Pro, VX1000 Pro and VX2000 Pro
NovaStar’s VX Pro series is offered in 4-port, 6-port, 10-port and 20-port configurations, and the VX600 Pro is the 6-port model. Every model in the series supports real 4K input at 4096×2160@60Hz over HDMI 2.0 and up to 256 presets, so the buying decision usually comes down to capacity and layer allocation.
| Model | Layer allocation (official) | Best fit |
| VX400 Pro | 6× 2K layers, or 1× 4K + 2× 2K layers | Smaller screens and lighter shows where 4 Ethernet ports are enough |
| VX600 Pro | 6× 2K layers, or 1× 4K + 2× 2K layers | Single 4K screens up to 3.9 million pixels; rental, stage and fine-pitch installs |
| VX1000 Pro | 6× 2K layers, or 1× 4K + 2× 2K layers | Larger screens that need more Ethernet ports and higher loading capacity |
| VX2000 Pro | 12× 2K, 6× DL, or 3× 4K layers | Multi-4K shows and complex multi-window productions |
In practical terms:
- Choose the VX600 Pro when one 4K screen or a small group of screens fits inside 3.9 million pixels, and you want video processing, fiber conversion and ByPass in a single box for a medium or high-end rental or stage rig.
- Step up to the VX1000 Pro when the wall outgrows 3.9 million pixels or you need more Ethernet ports to distribute the load.
- Step up to the VX2000 Pro when the production needs three 4K layers or twelve 2K layers at once.
- Comparing the smaller class? Our VX400 Pro vs VX400 breakdown covers the eight differences that actually matter.
If your requirement is only long-distance signal transport rather than full video processing, a dedicated fiber converter such as the CVT8-5GS is often the simpler answer. And if the job is multi-window video wall splicing rather than LED cabinet control, compare with the H9 video wall splicer. For whole-structure projects, our stage LED screen guide covers cabinet choice, rigging and pixel pitch.
9. FAQs
➖ What is the NovaStar VX600 Pro?
The VX600 Pro is an all-in-one LED display controller and video processor from NovaStar. It has 6 Gigabit Ethernet output ports, a 3.9-million-pixel loading capacity, a maximum output width of 10,240 pixels and a maximum height of 8,192 pixels, 6× 2K×1K layer resources, and HDMI 2.0, HDMI 1.3, 3G-SDI, 10G optical fiber and USB 3.0 inputs. It can operate as a video controller, a fiber converter or a ByPass unit.
➖ Can I use HDMI and SDI sources at the same time?
Yes. The VX600 Pro processes all inputs independently, so you can display HDMI, SDI, fiber and USB sources simultaneously across different layers. Remember that each layer consumes 2K×1K layer resources: a 4K source uses four, a 4K×1K source uses two and a 2K×1K source uses one.
➖ How many layers can I actually use with 4K sources?
The VX600 Pro provides 6× 2K×1K layer resources. One 4K×2K layer consumes four of those resources, so you can run one 4K×2K layer plus two 2K×1K layers (1× 4K + 2× 2K). If you work entirely at 2K×1K, you can open up to six layers. Watch the resource indicator in NovaLCT to stay inside the budget.
➖ Does the VX600 Pro support audio from multiple sources?
No. Only one audio source can be output at a time — either audio accompanied with an HDMI input, or the 3.5 mm independent audio input. You cannot mix audio from two HDMI devices. The independent audio path supports sampling rates up to 48 kHz, and the output volume is adjustable from the front panel.
➖ Why is part of my screen blank or showing the wrong content?
This usually means the screen layout in NovaLCT does not match your physical cabinet arrangement. Verify the cabinet resolution, the total row and column counts, the starting port and the data flow direction. Use the Mapping function to check physical connections, and split the screen if the total exceeds 3.9 million pixels, 10,240 pixels wide or 8,192 pixels high.
➖ Which software do I need to control the VX600 Pro?
For basic playback such as full-screen USB video you can use the front-panel knob and menu alone. For multi-layer layouts, custom resolutions, screen mapping, presets and brightness or chroma calibration you need NovaLCT (PC), the Unico web page over the Ethernet control ports, or the VICP mobile app.
➖ Where can I find the VX600 Pro manual, datasheet and firmware?
The Quick Start Guide ships in the box with the controller. The full technical reference is the VX600 Pro All-in-One Controller Specifications, document version V1.0.1 released 5 March 2025, which contains every connector, resolution, latency and physical specification. Firmware is updated from a USB drive. Always take firmware and control software from the manufacturer’s official distribution for your region, because the correct build depends on the hardware revision of your unit.
➖ What are the VX600 Pro dimensions, weight and power consumption?
The VX600 Pro measures 482.6 × 302.2 × 50.1 mm, weighs 3.9 kg net (6.5 kg total) and runs on 100–240 V~, 50/60 Hz with a rated power consumption of 41 W. It must be placed horizontally, operating temperature is 0 °C to 50 °C, and rack mounting requires at least eight M5×8 screws and a rack rated for at least 15 kg.
➖ What is the maximum screen size the VX600 Pro can drive?
A single VX600 Pro loads up to 3.9 million pixels, with a maximum output width of 10,240 pixels and a maximum height of 8,192 pixels across its six Gigabit Ethernet ports. Each port carries up to 650,000 pixels at 8-bit input. For walls above that capacity you either split the screen across multiple controllers or move up the series to the VX1000 Pro or VX2000 Pro.
➖ Is the VX600 Pro suitable for rental and stage use?
Yes. NovaStar positions the VX600 Pro for medium and high-end rental, stage control systems and fine-pitch LED screens. It has 256 presets for fast scene recall, an industrial chassis, ByPass mode with 0-frame latency for camera-facing screens, end-to-end backup between devices, input sources, Ethernet ports and OPT/Ethernet ports, and settings that are restored automatically after a power failure.
10. Conclusion
You now have everything you need to specify, set up, layer and control multi-source content on a NovaStar VX600 Pro all-in-one controller — from confirming the 3.9-million-pixel capacity against your wall, through defining the screen layout in NovaLCT, to combining live cameras, playback files and computer feeds in a single display.
If you are setting up for the first time, start with a simple two-layer layout (for example a full-screen background plus a PIP camera) to test signal flow and scaling. Once that works reliably, expand to more complex designs, and save each working arrangement into a preset so the same show can be recalled with one button.
Planning a stage, rental or fine-pitch installation around the VX600 Pro? HonghaiLED supplies LED displays and controllers as a matched package, so cabinet loading, port distribution and controller capacity are checked before the hardware ships. Send us your screen size, pixel pitch and cabinet type and we will confirm the configuration.
Related Posts
NovaStar MCTRL1600 LED Display Controller: Specs, Manual and Setup
Looking for NovaStar MCTRL1600 specifications, the manual, or a straight…
NovaStar MCTRL R5: Specs, Price, Manual & Setup Guide
The NovaStar MCTRL R5 is an independent LED display controller…
NovaStar VX1000 Pro LED Controller: Specs, Manual & Price
The NovaStar VX1000 Pro is an all-in-one LED display controller…

No Comments