
NovaStar H9 Video Wall Splicer: Specs, Manual & Setup Guide
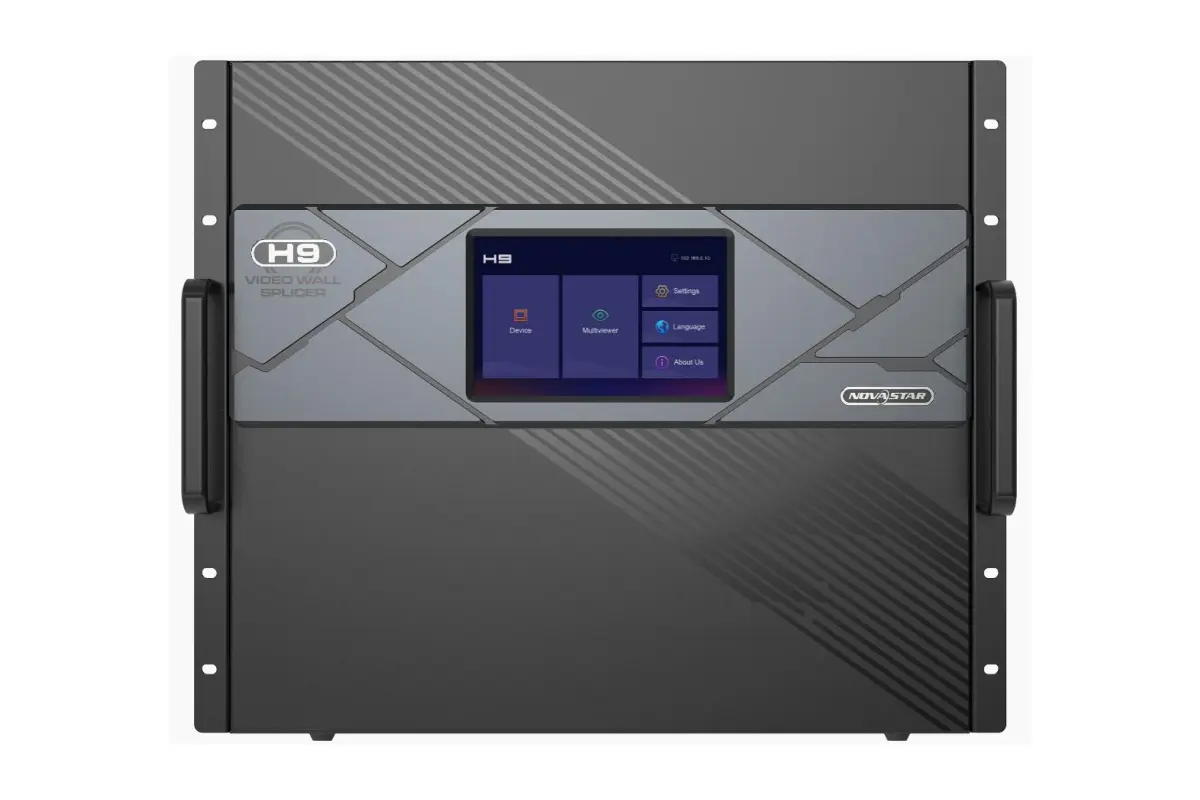
NovaStar H9 is a 9U modular video wall splicer from the NovaStar H Series. One chassis holds up to 15 input cards and 5 output cards (10 on the H9 Enhanced), loads up to 65,000,000 pixels with H_20xRJ45 sending cards or 130,000,000 pixels with the H_4xfiber sending card (enhanced), and supports 80 layers (160 on H9 Enhanced) with up to 2,000 presets. Everything is configured and operated in a web browser, so no application installation is required for daily operation.
The NovaStar H9 is a splicing processor that combines video processing and video control in one unit, or works as a pure splicing processor. This guide covers the official H9 and H9 Enhanced specifications, the manual and default IP address, first-time setup, layer limits, and what to check before you buy.
Contents
1. What is the NovaStar H9 video wall splicer?
2. NovaStar H9 vs H9 Enhanced: what is the difference?
3. NovaStar H9 specifications (official)
4. What is the NovaStar H9 used for?
5. NovaStar H9 manual, default IP and downloads
6. Is the NovaStar H9 worth buying?
7. How do you set up the NovaStar H9 for the first time?
8. How do you add and manage layers on the NovaStar H9?
9. NovaStar H9 FAQs
10. Conclusion
1. What is the NovaStar H9 video wall splicer?
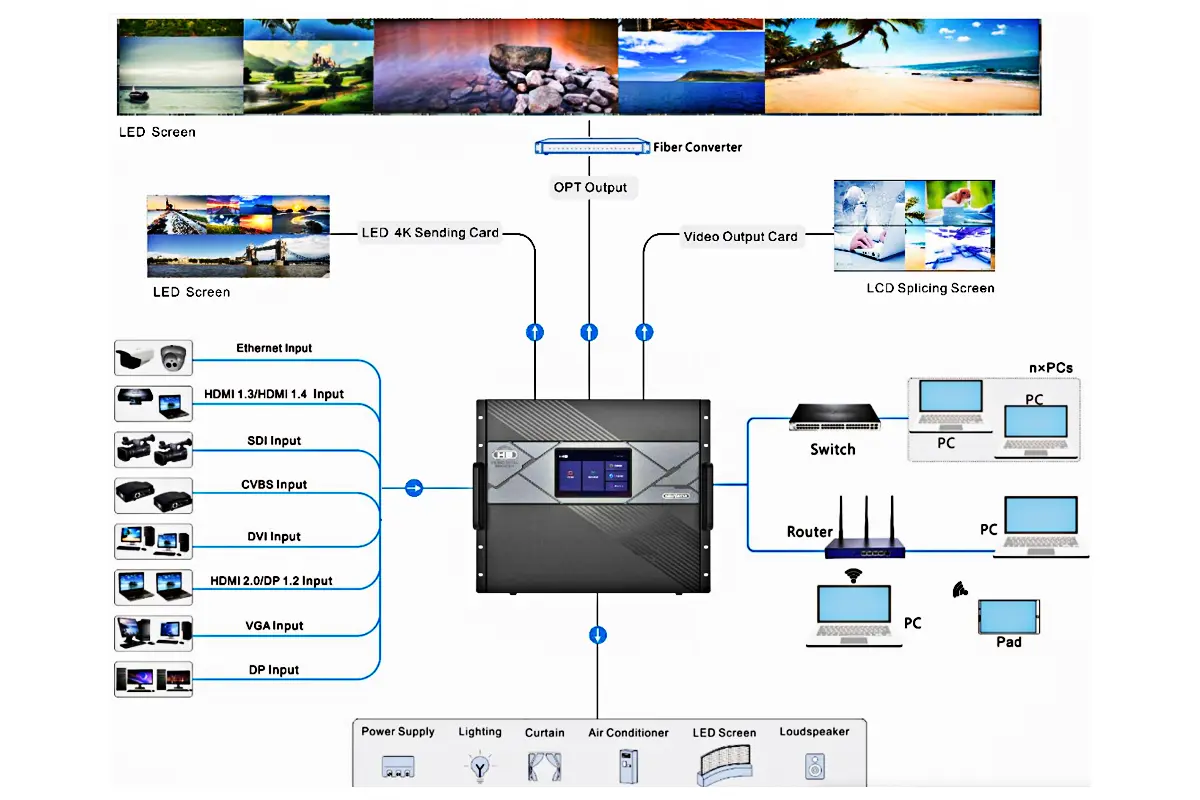
The NovaStar H9 is a modular, rack-mounted video wall splicer built for large-scale LED video walls rather than LCD or projection systems. It receives multiple video sources, composites them into layered scenes, and outputs pixel-accurate signals to NovaStar sending cards over Ethernet or optical fiber. NovaStar describes the H9 as NovaStar’s newest generation of video wall splicer, designed especially for fine-pitch LED screens.
Key functions of the NovaStar H9
Multi-source, multi-layer composition
The H9 composes live inputs, graphic layers, and text layers in real time as separate windows with independent size, position, and z-order. A single output card supports up to 16x 2K layers, 8x dual-link layers, 4x 4K layers, or 2x 8K layers, while the chassis supports 80 layers on the H9 and 160 layers on the H9 Enhanced.
10-bit processing with HDR10 and HLG
The H9 accepts and processes 10-bit video and supports HDR10 and HLG, with automatic decryption of HDCP-encrypted sources and support for decimal frame rates. Processing runs on a modular FPGA hardware architecture rather than a PC-based operating system.
Preset groups and instant scene switching
Screen layouts, layer positions, sources, and sizes are stored internally as presets. Up to 2,000 presets are supported with preset playlist playback, and presets from multiple screens can be grouped for synchronised switching across a whole control room.
Browser-based control (B/S architecture)
Control runs over the built-in web interface on Windows, macOS, iOS, Android, or Linux. Multiple users can work in the interface at the same time, and no application program is required. NovaLCT remains useful for sending card screen configuration and for projects that mix several controller generations.
Hot-swappable, serviceable hardware
Input and output cards are hot-swappable, and the chassis supports online firmware upgrade. Optional redundant power modules and input/output monitoring are available for installations that cannot accept a single point of failure. The H9 outputs to NovaStar sending cards such as the H_16xRJ45+2xfiber and H_20xRJ45 cards, which in turn drive the receiving cards inside the cabinets.
2. NovaStar H9 vs H9 Enhanced: what is the difference?
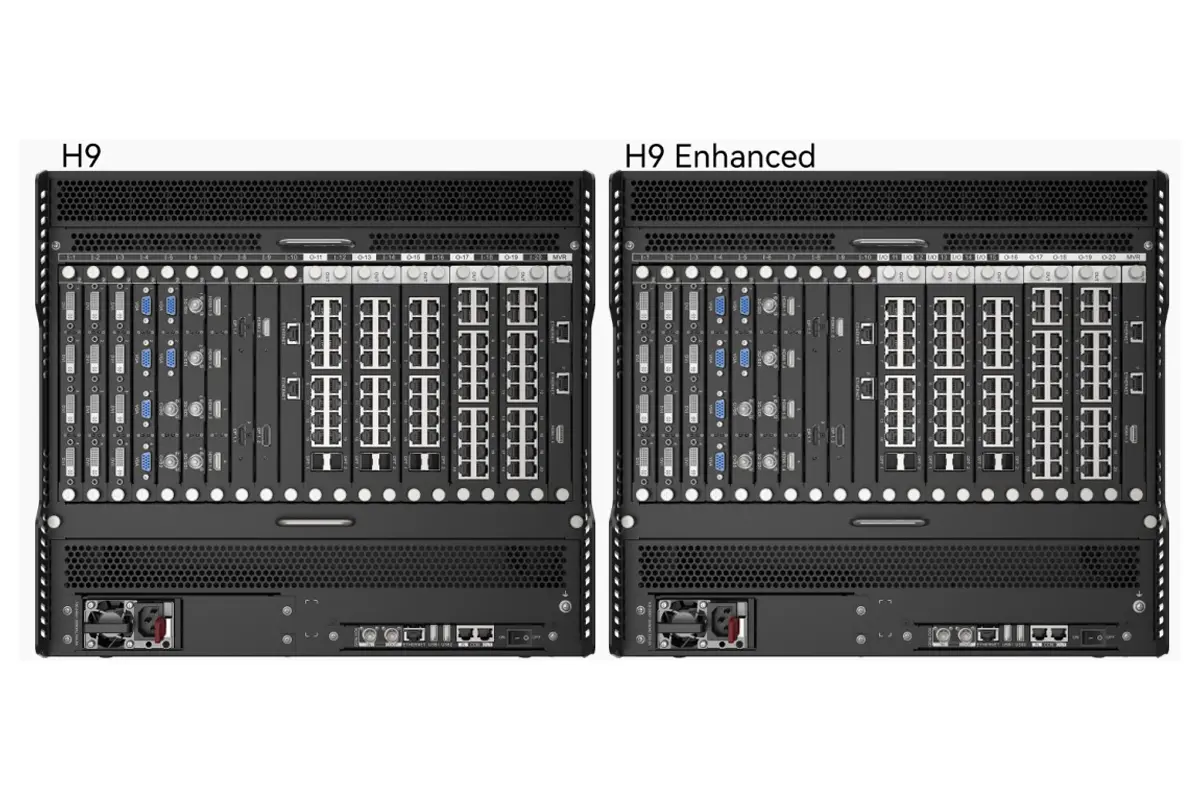
Both versions share the same 9U chassis, 15 input card slots, web interface, and 2,000-preset capacity. The H9 Enhanced doubles the output card slots, the layer count, and the maximum pixel load, which is why it appears as a separate model on reseller listings and in search results.
| Item | NovaStar H9 | NovaStar H9 Enhanced |
| Rack units | 9U | 9U |
| Max. input cards | 15 | 15 |
| Max. output cards | 5 | 10 |
| Max. layers | 80 layers | 160 layers |
| Max. loading capacity with H_20xRJ45 sending card | 65,000,000 pixels | 65,000,000 pixels (H_20xRJ45) |
| Max. loading capacity with H_4xfiber sending card (enhanced) | 130,000,000 pixels | 260,000,000 pixels |
| Max. presets | Up to 2,000 with preset playlist playback | Up to 2,000 with preset playlist playback |
| 10-bit and HDR | Yes | Yes |
| Optional redundant power supply | Yes | Yes |
Practical takeaway: choose the standard H9 when the wall is driven by a small number of sending cards and 80 layers is enough. Choose the H9 Enhanced when the project needs more than five output cards, more than 80 simultaneous layers, or a pixel load above 130 million pixels.
3. NovaStar H9 specifications (official)
The figures below are taken from the NovaStar H Series comparison table and the H9 Video Wall Splicer Specifications document (V1.17.0, released 30 May 2026). NovaStar publishes a full card-level specification document because the H9 is configured card by card, so two H9 chassis can differ substantially in capability.
Core capacity and processing
| Category | NovaStar H9 specification |
| Chassis | 9U modular, plug-in chassis; 15 input card slots; 5 output card slots (10 on H9 Enhanced) |
| Max. loading capacity | 65,000,000 pixels with H_20xRJ45 sending cards; 130,000,000 pixels with H_4xfiber sending card (enhanced); 260,000,000 pixels on H9 Enhanced |
| Max. layers | 80 layers (H9); 160 layers (H9 Enhanced). Single card: up to 16x 2K, 8x dual-link, 4x 4K, or 2x 8K layers |
| Max. output | Single video connector 2560×2560 pixels; single Ethernet port 10752×10752 pixels; single OPT port 16384×16384 pixels |
| Video processing | 10-bit input and processing, HDR10 and HLG, HDCP auto decryption, decimal frame rates supported |
| Multi-capacity input per slot | 4x 2Kx1K@60Hz, 2x 4Kx1K@60Hz, 2x 4Kx2K@60Hz, or 1x 4Kx2K@120Hz / 8Kx4K@30Hz |
| IP decoding | H_2xRJ45 IP input card supports up to 512 IP camera inputs plus input mosaic |
| Presets | Up to 2,000 presets, playlist playback supported |
| Certifications | CCC, CE, FCC, IC, KC, RCM, UKCA, UL, CB, CMIM, PSE (confirm the certification required for your market with NovaStar) |
Input, output and control cards
| Item | Options |
| Input cards | H_1xHDMI2.1+1xDP1.4, H_2xDP1.2, H_1xNDI (1x RJ45 gigabit Ethernet), H_1xST2110 (2x 25G OPT), H_4xDVI, H_4xHDMI (2x HDMI 1.3 + 2x HDMI 1.4), H_2xHDMI2.0+2xDP1.2, H_2xHDMI2.0, H_2xRJ45 IP, H_4x3G SDI, H_1x12G SDI, H_2xCVBS+2xVGA, H_4xVGA, H_4xHDBaseT, H_2xAudio input+2xAudio output, H_4xfiber input |
| Sending (output) cards | H_20xRJ45 (13,000,000 pixels per card), H_16xRJ45+2xfiber (10,400,000 pixels plus two OPT ports that copy the Ethernet outputs), H_4xfiber (20,800,000 pixels; independent, copy and backup modes), H_4xfiber sending card (enhanced) (26,000,000 pixels; copy and backup modes) |
| Other output cards | H_1x12G SDI, H_4x3G-SDI, H_4xDVI, H_4xHDMI 1.4, H_1xHDMI2.0, H_4xHDBaseT |
| Monitoring | H_2xRJ45+1xHDMI1.3 preview card provides input and output monitoring plus an HDMI 1.3 monitor output |
| Audio | H_2xAudio input+2xAudio output card; each screen supports one audio output |
| Control | Built-in web interface (B/S architecture), TCP/IP and RS232 central control, OSD, BKG, permission management, optional touch panel control |
| Sync | Genlock input and loop, bi-level and tri-level |
| Power | Optional redundant H_800W power module, 100 to 240 V~, 50/60 Hz, max. 800 W |
One compatibility note worth planning around: the H_4xfiber sending card (enhanced) cannot be used together with the H_4xfiber sending card to load the same screen, and fiber sending cards cannot be combined with the H_20xRJ45 sending card on the same screen. Mixing card generations inside one chassis is possible, but screen-level card pairing is restricted.
4. What is the NovaStar H9 used for?
The H9 is aimed at professional environments where large LED video walls must run continuously while displaying several live sources and switching layouts quickly. NovaStar lists energy and power, water conservancy and hydrology, meteorology and earthquake prediction, enterprise management, steel metallurgy, banking and finance, public security traffic management, exhibitions and presentations, production scheduling, radio and television, educational and scientific research, and stage rental among its target applications.
Emergency and traffic command centres
Operators monitor camera feeds, GIS maps, sensor data, and communication channels on one wall, and switch to an emergency layout through a stored preset.
Broadcast studios and live production
Studios composite camera feeds, graphics, and replay sources onto studio backdrops, with frame synchronisation across output connectors and 12G-SDI output available when the signal chain requires it.
Corporate lobbies and control rooms
Dashboards, welcome messages, and presentations share one screen, with separate presets for visitor and internal views.
Transportation hubs
Airports, rail stations, and metro operators combine schedules, security views, and public announcements, with optional redundant power for continuous operation.
Events, stages and rental LED walls
Rental suppliers benefit from browser-based control, hot-swappable cards, and fast preset recalls. For touring work, pair the H9 with a suitable rental LED display so cabinet and processor are specified together.
5. NovaStar H9 manual, default IP and downloads
Most H9 support questions come down to three things: the default network address, how to reach the web interface, and where the official documentation lives. Here are the answers in one place.
| Question | Answer |
| Default IP address | 192.168.0.10 (set your control computer to the same subnet, for example 192.168.0.x with x not 10) |
| Default username and password | admin / admin |
| How to open the interface | Connect a computer to the ETHERNET port on the control card, then browse to the device IP address. Chrome and other modern browsers work; Windows, macOS, iOS, Android, and Linux are supported |
| How to find the current IP | The device IP address is shown at the top right of the home screen on the front panel or on the monitor connected to the control card |
| Firmware updates | Online firmware upgrade is supported through the web interface. Back up the device configuration first and do not power off during the upgrade |
| Configuration backup | The control card provides USB ports for updating the device program and for importing or exporting configuration parameters. These USB ports do not supply power to connected devices |
Official NovaStar documents to keep on hand
NovaStar publishes the H9 Video Wall Splicer Specifications (V1.17.0, 30 May 2026), the H Series Video Wall Splicers User Manual (V1.15.0), and the H Series Quick Start Guide on its official website. Download them from NovaStar directly so you always work from the current revision, because card-level details such as the H_4xfiber input card and the H_4xfiber sending card (enhanced) were added or revised in recent document versions.
NovaStar software and files
- NovaLCT software download list for sending card configuration
- RCFG and RCFGX receiving card file downloads when a cabinet file must be matched to the display
- NovaStar LED control software overview to compare NovaLCT, VNNOX and other tools
If you are still choosing a platform, the NovaStar H Series splicing processors overview compares the H2, H5, H9, H15, and H20, and NovaStar H Series vs VX Series explains when a video wall splicer is the better fit than an all-in-one controller.
6. Is the NovaStar H9 worth buying?
Worth it if the wall must run continuously, show several live sources at once, and recover from a card or power failure without stopping the show. Not worth it if you only need a single looping video or one laptop mirrored to a wall.
The H9 is a good fit when
- The LED wall is large enough that pixel capacity and card count matter, for example a 4K or larger control-room or broadcast wall.
- Several live sources such as cameras, PCs, and maps must be shown together and switched instantly.
- IT policy blocks installing controller software on operator machines, so browser-only control is an advantage.
- The project already uses NovaStar sending cards and receiving cards, so the H9 integrates with the existing signal chain.
- Redundancy matters: hot-swappable cards and an optional redundant power module reduce single points of failure.
- You need stage rental workflow features such as preset playlists, matrix mode, and fast layout recalls.
The H9 is not the right answer when
- You only need a single video loop or one mirrored laptop screen. A basic media player or controller costs far less.
- The cabinets use non-NovaStar receiving systems without compatible sending cards.
- The requirement is a small, temporary installation where rental or a software-based solution is more flexible.
- You expect plug-and-play. The H9 needs screen configuration, network addresses, and sending card mapping before it runs.
How much does a NovaStar H9 cost?
There is no single list price, because an H9 is quoted as a chassis plus a specific set of input and output cards, and the standard H9 and H9 Enhanced are separate models with different loading limits. Resellers list both versions as distinct SKUs, so a quote is only comparable when it states the chassis version, the sending cards included, the input card mix, and whether redundant power is fitted. Send us your wall dimensions, pixel pitch, source list, and required inputs, and we will help you work out the card configuration and the controller or processor that fits the project budget.
7. How do you set up the NovaStar H9 for the first time?
The H9 is not plug-and-play, but the sequence below matches the order used in the official user manual and avoids the two most common mistakes: connecting LED cabinets directly to the processor, and using the wrong default address.
Step 1: Install the chassis and cards
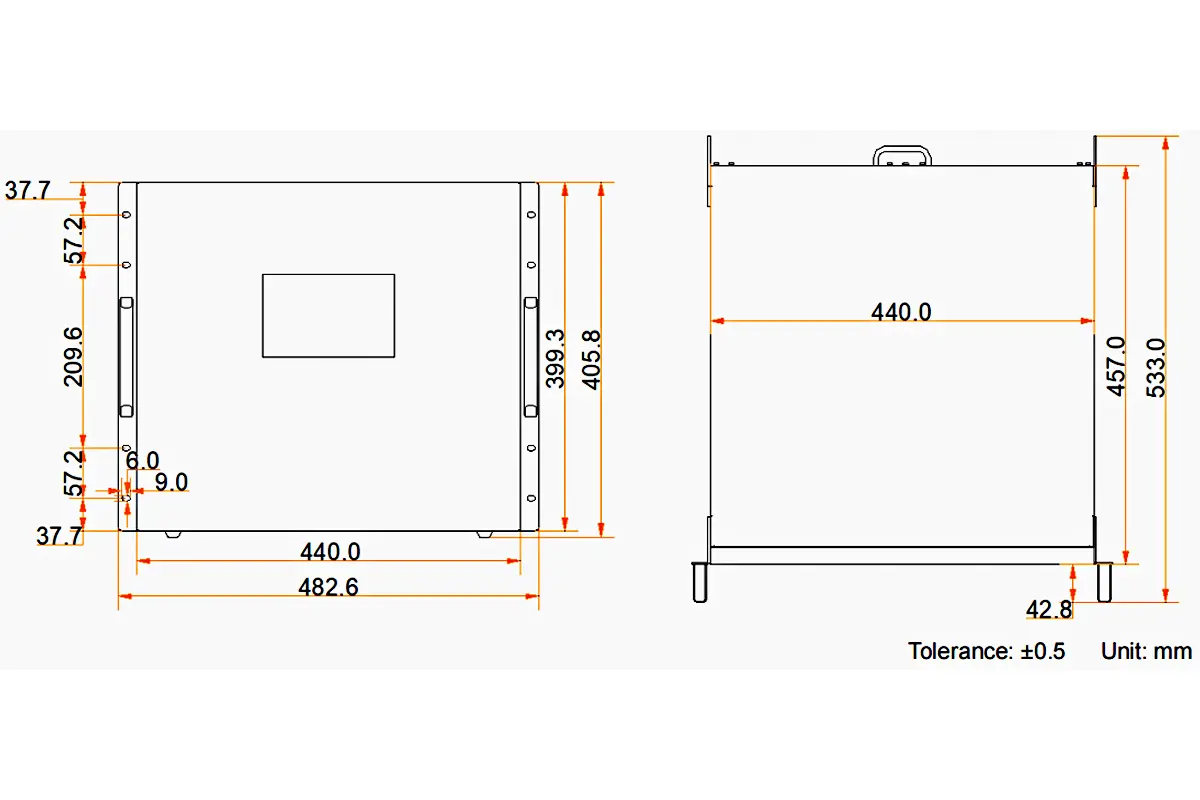
- Mount the 9U chassis in a rack with clearance on both sides for airflow.
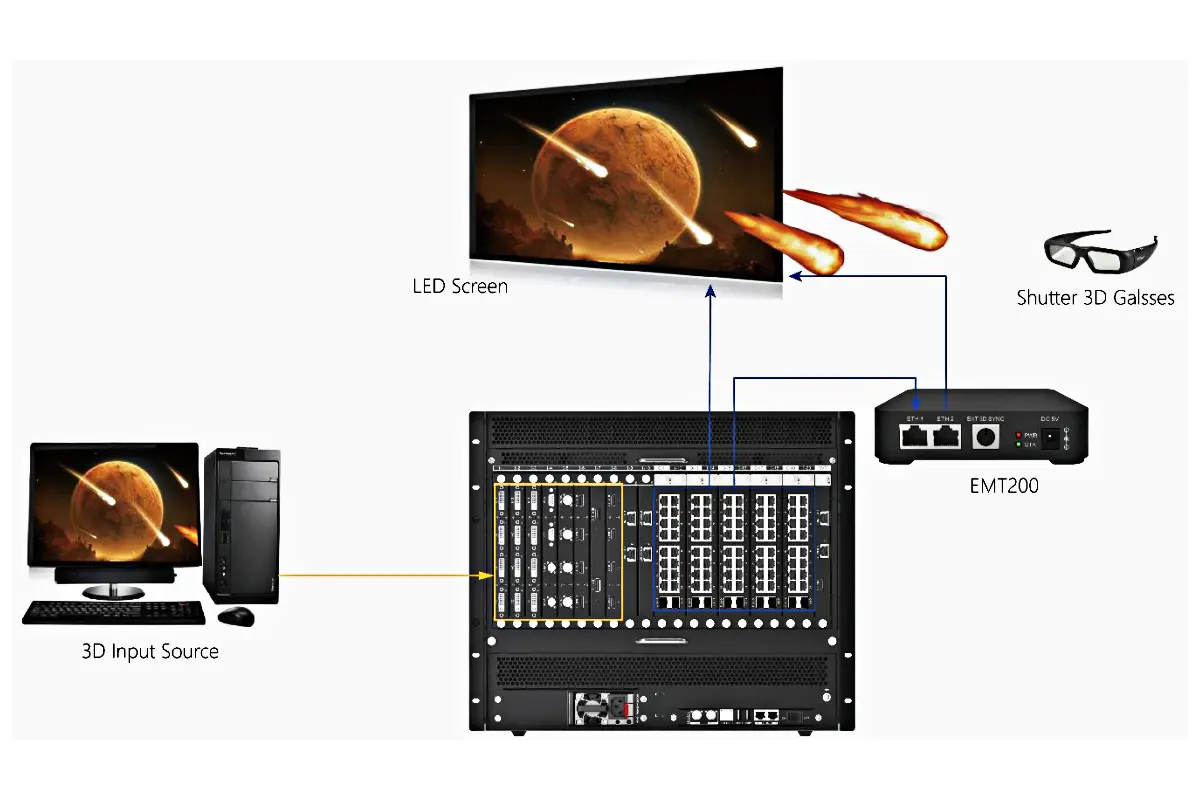
- Insert the required input cards and output (sending) cards into the chassis. Cards are hot-swappable.
- Fit the optional redundant power module if the installation cannot tolerate a power module failure, and connect the power supplies to separate circuits where possible.
- Do not connect LED cabinets directly to the processor. The H9 outputs to NovaStar sending cards, which connect to receiving cards in the cabinets.
Step 2: Connect sources and outputs
- Connect video sources to the input card connectors (HDMI, DisplayPort, DVI, SDI, VGA, CVBS, HDBaseT, IP, fiber, as fitted).
- Connect the sending card outputs to the LED wall using Cat6 or optical fiber as appropriate for the card type.
- Connect the control computer to the ETHERNET port on the control card. Add the preview card if input and output monitoring is required.
Step 3: Set the network address
- The default device IP address is 192.168.0.10. NovaStar notes that 192.168.0.100 is the default used in some example configurations, so confirm the address shown on the device home screen rather than assuming it.
- Set the control computer to an address on the same subnet and with the same subnet mask and gateway, for example 192.168.0.20, and make sure it is not the same address as the device.
- Open a browser and enter the device IP address, then log in with the default username and password, admin and admin.
- Change the device IP address to match the site network, and reboot if the firmware requires it.
Step 4: Configure the screen
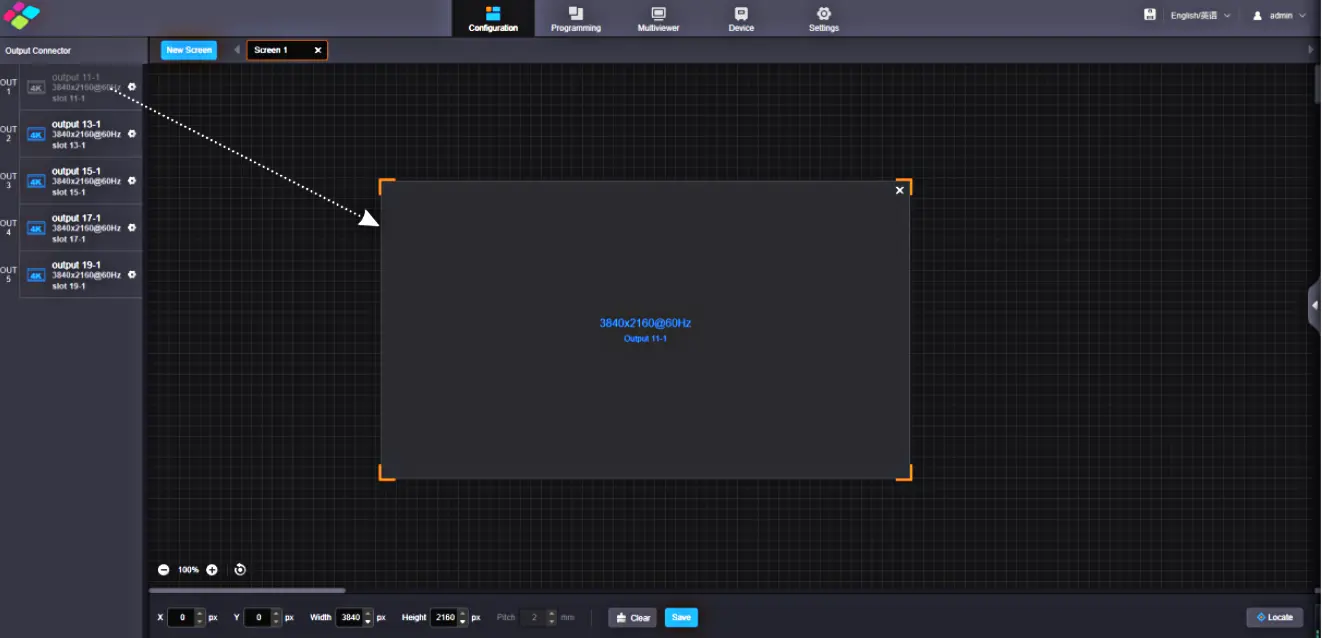
- Create a new screen in the web interface, give it a recognisable name, and set the screen rows and columns to match the physical build.
- Select the output card that loads the screen and drag it onto the screen area. Each screen can have its own output resolution, and irregular mosaic configurations are supported.
- Save the screen configuration. Settings are stored inside the device and are retained after a power cycle.
Step 5: Add sources and save a preset
- Open the programming page and drag the required input sources onto the screen canvas.
- Adjust size, position, and z-order for each layer, and add text or graphic layers where required.
- Save the layout as a preset so an operator can recall the whole scene with one click.
8. How do you add and manage layers on the NovaStar H9?
Layers are the building blocks of every H9 scene. Each layer is one source, graphic, or text element placed on the screen canvas, with its own position, size, and order. Layer work happens entirely in the web interface.
Open the layer workspace
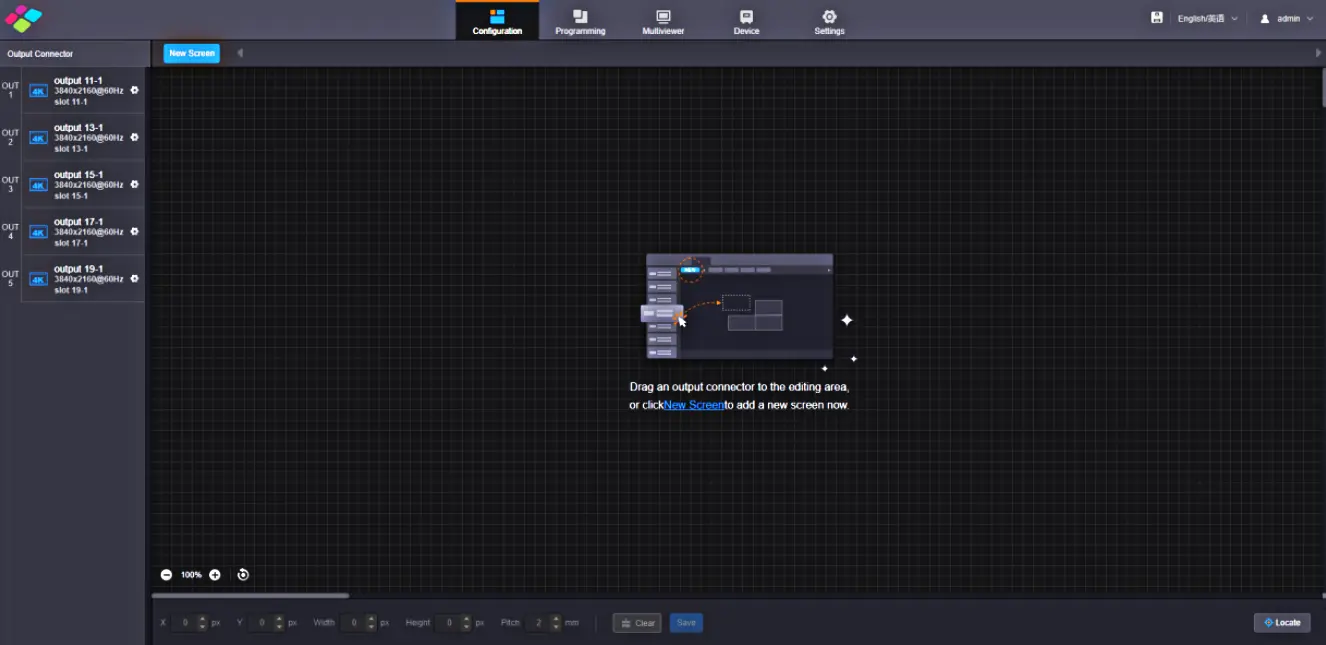
Log in to the web interface, select the screen you want to work on, and open the programming view. The canvas shows the screen at its configured resolution, so what you arrange is what the wall displays.
Add a layer
- Input layer: choose a live source from the input list. With the H_2xRJ45 IP input card, mosaic sources can cover up to 512 IP camera inputs.
- Graphic layer: add a logo, lower third, or other prepared image.
- Text layer: create static labels or dynamic OSD text, with configurable content, scrolling direction, speed, and font style.
Position, size and z-order
Drag a layer to move it, and resize it from its handles. Use the layer list to bring a layer forward or send it backward, since overlays such as tickers and lower thirds must sit above the video layers. The chassis supports 80 layers on the standard H9 and 160 layers on the H9 Enhanced, so very dense layouts should be planned against the version you own.
Save, recall and edit presets
Save a finished layout as a preset and give it an operational name such as Morning Briefing or Emergency Mode. Presets can be recalled instantly without a reboot, and preset groups let several screens switch together. Up to 2,000 presets are supported, with playlist playback for scheduled or sequenced switching.
9. NovaStar H9 FAQs
➖ What is the default IP address of the NovaStar H9?
The default device IP address is 192.168.0.10. Set the control computer to the same subnet with the same subnet mask and gateway, for example 192.168.0.20, then browse to the device address to open the web interface. NovaStar also documents 192.168.0.100 as a default in some example configurations, so confirm the address shown on the device home screen.
➖ What is the default username andpassword for the NovaStar H9?
The default user name and password are both admin. Change the password as part of commissioning, and use permission management if several operators share the system.
➖ What is the default username andpassword for the NovaStar H9?
The H9 Enhanced doubles three limits on the same 9U chassis: 10 output card slots instead of 5, 160 layers instead of 80, and a maximum load of 260,000,000 pixels instead of 130,000,000 pixels when using the H_4xfiber sending card (enhanced). Both versions support 15 input cards, up to 2,000 presets, 10-bit processing, HDR10 and HLG, and an optional redundant power module.
➖ How many pixels can a NovaStar H9 load?
With H_20xRJ45 sending cards the H9 loads 65,000,000 pixels. With the H_4xfiber sending card (enhanced) the standard H9 reaches 130,000,000 pixels, and the H9 Enhanced reaches 260,000,000 pixels. Each H_20xRJ45 card loads 13,000,000 pixels and each H_4xfiber sending card (enhanced) loads 26,000,000 pixels.
➖ Does the NovaStar H9 support NDI or ST 2110?
Yes. NovaStar offers an H_1xNDI input card with one RJ45 gigabit Ethernet input and an H_1xST2110 input card with two 25G optical ports, so networked video can be brought in through dedicated input cards rather than an external converter. SRT and RTMP are not native input formats, so use an external decoder for those sources.
➖ Does the NovaStar H9 support audio?
Yes, when the chassis is fitted with the H_2xAudio input and 2xAudio output card. Audio output is supported per screen, and each screen supports one audio output. Without that card the H9 processes video only, so audio must be handled separately.
➖ Can the NovaStar H9 drive LED panels directly?
No. The H9 outputs to NovaStar sending cards over Ethernet or optical fiber, and those sending cards drive the receiving cards inside the LED cabinets. It cannot connect directly to LED panels or to non-NovaStar receiving systems without compatible sending cards.
➖ How many layers and presets does the NovaStar H9 support?
The standard H9 supports 80 layers and the H9 Enhanced supports 160 layers. A single output card can carry up to 16x 2K layers, 8x dual-link layers, 4x 4K layers, or 2x 8K layers. Up to 2,000 presets are supported, with preset playlist playback.
➖ Can NovaStar H9 firmware be updated over the web?
Yes. Online firmware upgrade is supported through the web interface. Export the device configuration first, do not power off during the upgrade, and download firmware only from NovaStar’s official website so the file matches the hardware revision.
➖ How much does a NovaStar H9 cost?
There is no single list price. An H9 is quoted as a chassis plus a chosen set of input and output cards, and the standard H9 and H9 Enhanced are separate models. Ask for a written configuration that lists the chassis version, sending cards, input card mix, and whether redundant power is included, so competing quotes can be compared fairly.
10. Conclusion
The NovaStar H9 is a 9U modular video wall splicer that combines video processing and video control for fine-pitch LED walls. Know which limits your project actually touches, because the standard H9 and the H9 Enhanced differ in output card slots, layer count, and maximum pixel load. Confirm the default IP address on the device, plan the input and sending cards together with the screen design, and the H9 will handle control room, broadcast, transport, and rental work with the same workflow.
Continue with the NovaStar H Series splicing processors overview to compare the H9 with the H2, H5, and H15, read the NovaStar H5 video wall splicer guide for smaller walls, and use NovaStar H15 review when 8K capability is on the requirement list. If you are weighing an all-in-one controller instead, start with H Series vs VX Series and the NovaStar VX16s all-in-one controller.
Need help specifying the processor and the indoor LED screen or LED video wall for your project? Send us your wall dimensions, pixel pitch, viewing distance, and source list, and we will recommend the card configuration and controller that fits.
Related Posts
NovaStar MCTRL1600 LED Display Controller: Specs, Manual and Setup
Looking for NovaStar MCTRL1600 specifications, the manual, or a straight…
NovaStar MCTRL R5: Specs, Price, Manual & Setup Guide
The NovaStar MCTRL R5 is an independent LED display controller…
NovaStar VX600 Pro: Specs, Manual, Setup & Layer Guide
Novastar VX600 Pro isn’t just a video wall controller—it’s the…

No Comments